No chance. There is zero space under the seats. If there were, we'd be able to lower our seats more. Not going to happen.I’m anyone yet able to confirm whether one of the Pioneer (or similar) underseat subs, actually fits in an Emira?
Navigation
Install the app
How to install the app on iOS
Follow along with the video below to see how to install our site as a web app on your home screen.
Note: This feature may not be available in some browsers.
More options
Style variation
Adding a subwoofer
- Thread starter John_Matrix
- Start date
Yeah there are a few considerations (there are tons, but these are my most important):
1 - volume of air moved (cone diameter, excursion)
2 - low frequency range
I'm part owner of a headphone company (thinksound) and know a bit about audio, but that doesn't extend to car audio for the most part...some principle are consistent but the environment is completely different. The way I approach the above is:
1 - There's no way around this, the little guy is smaller. It does have a ton of excursion though, so pushes more air than other small subs. An 8" would move more though, no question. I'm not too concerned about this, since the cabin is so small - compare the Emira cabin size to a sedan, and it's pretty clear that the relative air being moved by a little sub is far greater than a big sub in a big car.
2 - This thing hits 35Hz! That's kind of perfect and you'd have to go 10" at least to get lower (in the Focal range for example). Below 30Hz would be great, but I'm more a fan a tight bass vs thumping bass, and I feel that tight controlled sound is more aligned with the spirit of a sports car: precision sound for a precision car. Also, since I'm going to run a DSP, I can extend the frequency range a bit lower than 35Hz.
3 - loudness. Everything will be loud enough, this is a non-issue.
I run an 8" sub under the seats of my old Defender 110 (so 2 total) and they are absolutely perfect: punchy, precise, and you feel it in your chest if the bass is turned up even a little. That experience changed how I plan out audio installs. Full transparency, if I can fit this instead, I probably will: https://www.crutchfield.com/p_091SUBP20S/Focal-P-20-FSE.html?tp=111
I mean, who knows what it will actually sound like...I'll have to install it and report back - car arrives in August...so be patient")
Cool, hoping to see how it turns out. Remember to come back and post. Haha.
For those of you on here, like me that would like to replace the existing subwoofer with something better in the factory location here are my thoughts.
I’ve had the interior of my car apart the past few weeks to install sound deadener and look at upgrading the subwoofer. I’ve taken the door panels off and installed deadener both on the interior of the exterior of the doors and on the interior door panel mounting area as others have done. I have also removed all the components in the rear areas that house the rear speakers and have applied sound deadener in those areas. The sound deadener really helps improve the interior space and may in itself help how we hear the sound in the car (It certainly feels like it does). My initial plan was to upgrade the 6X9 subwoofer in the factory location using the speaker linked below. It has some pretty good specs, and I thought I could modify the factory sub box to make this work. I do believe I could make that large speaker fit but I’m not sure if it would have the ideal volume that speaker would like to perform optimally. I’ve learned a lot from others on the forum and learned that the factory speaker is a dual voice coil, the replacement I chose is not, so If I hooked it up to the factory amp, I would lose half of its power. I don’t know how much power the factory amp puts out, but it likely not enough to power the new sub adequately. I can’t locate another 6X9 subwoofer with a dual voice coil as an alternative option.
The factory sub box is in there pretty tight. It uses the drain hole on the bottom as one of the mounts to the vehicle along with two bolts on the upper portion that tie into the body shell. If someone had the skill (I unfortunately don’t) to design and fabricate a new enclosure that uses those factory mounts and could perhaps support an 8-inch driver, that would seem to be ideal. There is about 1 ½” in front of the factory sub enclosure before you hit an immovable object so not a lot of extra room to build a larger enclosure. If you could then find a decent 8-inch subwoofer that was also a dual voice coil maybe the factory amp has a chance of running it cleanly (I wish we knew the specs on the factory amps). I also wonder why KEF wouldn’t have just designed this space for an 8-inch sub? Additionally, there is not much extra room in either cavity to add an amp for a new subwoofer and I don’t think either of the two factory amps can be removed if you continue to run the factory system (versus complete replacement).
I have also tried the system after the sound deadener was installed running some heavy bass EDM music in the car. I can say that factory 6X9 is trying pretty hard to put out some sound with mixed results. I can’t say the same about the 2 other 5 inch mid bass speakers mounted higher in the rear. They don’t seem to contribute much. I’m wondering now how closely the EQ settings are related to the three speaker types. Maybe increasing the mid bass relates primarily to those 5-inch upper rear speakers. I’ll play around with that a bit to see if there is a setting that may optimize their use.
I’m waiting for some more supplies so the rear area will be apart for a bit. If anyone needs any pictures or has any other question about that area, please let me know.
Here is the 6X9 sub I found.
https://www.mmatsproaudio.com/site/product/mbw690/?gQT=1#
Last edited:
A few other observations. The pressure relief piece that is installed near the sub did not fit very well and kept falling out if I bumped it. I wrapped some felt tape around where it mounts and that tightened the fit up quite a bit. Those pieces also flap a lot when the sub is being used and make some noise. I'm not sure if it can be heard when all of the trim panels are reinstalled. You can see it's relation to the sub in the picture below.


invictusmaneo
Member
there are a few 6x9 sub offerings out there, the MMATs doesn't appear to be DVC if the amp is really 2ch. CDT still makes solid offerings, but SVC. Tang Band used to have a killer long throw 6x9 sub but it doesn't appear to be for sale anymore.
Another test or bit of research is whether the factory amp channels can be bridged (doubt it) as that will unlock power/flexibility to use a SVC driver in it's place. The other challenge is a lot of drivers aren't designed and don't do well in IB/free air installations, so a drop in replacement may not give better results. Doesn't look like a lot of room to squeeze a fiberglass enclosure in there realistically either.
Another test or bit of research is whether the factory amp channels can be bridged (doubt it) as that will unlock power/flexibility to use a SVC driver in it's place. The other challenge is a lot of drivers aren't designed and don't do well in IB/free air installations, so a drop in replacement may not give better results. Doesn't look like a lot of room to squeeze a fiberglass enclosure in there realistically either.
A cheap $60 experiment: https://www.ebay.com/itm/365416705153?chn=ps&mkevt=1&mkcid=28&google_free_listing_action=view_itemthere are a few 6x9 sub offerings out there, the MMATs doesn't appear to be DVC if the amp is really 2ch. CDT still makes solid offerings, but SVC. Tang Band used to have a killer long throw 6x9 sub but it doesn't appear to be for sale anymore.
Another test or bit of research is whether the factory amp channels can be bridged (doubt it) as that will unlock power/flexibility to use a SVC driver in it's place. The other challenge is a lot of drivers aren't designed and don't do well in IB/free air installations, so a drop in replacement may not give better results. Doesn't look like a lot of room to squeeze a fiberglass enclosure in there realistically either.
As an eBay Associate we earn from qualifying purchases.
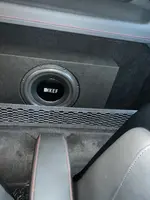
Installed my 10" Kicker Hideaway subwoofer yesterday as an extension to the OEM sub and I'm very happy with the outcome. I placed it flush against the shelf back wall firmly stuck with velcro pieces. As @Nova mentioned in a recent post, the seat brackets are so low, and they move so far back that no component could possibly fit there. On the compromising side, the Kicker sub is compact enough as to not take up much space on the shelf and, if more space were needed, I could temporarily remove the sub by simply unplugging a single wire loom/harness.
For those interested in this mod or something similar, to make your life easier, here are the speaker wire color codes (the ones connected to the OEM sub shown in @FearGuise's earlier post):
For Left Hand Drive
White with Violet Stripe (positive) - Driver's side rear speaker
Solid Yellow (negative) - Driver's side rear speaker
Green with White Stripe (positive) - Passenger side rear speaker
Solid Blue (negative) - Passenger side rear speaker
For the 10" Kicker installation, the Solid Blue wire (REM) which is one of the wires included in the Kicker's wire harness, is not needed or useful since the Emira's OEM sound system already sends an on/off signal to the unit. All you need to do is place the switch at the bottom of the unit to "DC Offset Turn-On". As for the Red Power wire, it gets connected directly to the battery and the Black Ground wire can be connected to one of the 4 bolts of the lower shelf which hold down the strap loop brackets).
This was, imo, a very straightforward install and, along with my previous addition of A-Pilar tweeters, it concludes my Emira sound system upgrade . I'm now satisfied with the overall sound improvement having more surrounding sound from the front section and, imo, the also much needed richer and deeper bass.
A special thanks to @FearGuise for his suggestions and posted pictures and hoping that you're all successful in your own sound system mods.
Installed my 10" Kicker Hideaway subwoofer yesterday as an extension to the OEM sub and I'm very happy with the outcome. I placed it flush against the shelf back wall firmly stuck with velcro pieces. As @Nova mentioned in a recent post, the seat brackets are so low, and they move so far back that no component could possibly fit there. On the compromising side, the Kicker sub is compact enough as to not take up much space on the shelf and, if more space were needed, I could temporarily remove the sub by simply unplugging a single wire loom/harness.
For those interested in this mod or something similar, to make your life easier, here are the speaker wire color codes (the ones connected to the OEM sub shown in @FearGuise's earlier post):
For Left Hand Drive
White with Violet Stripe (positive) - Driver's side rear speaker
Solid Yellow (negative) - Driver's side rear speaker
Green with White Stripe (positive) - Passenger side rear speaker
Solid Blue (negative) - Passenger side rear speaker
For the 10" Kicker installation, the Solid Blue wire (REM) which is one of the wires included in the Kicker's wire harness, is not needed or useful since the Emira's OEM sound system already sends an on/off signal to the unit. All you need to do is place the switch at the bottom of the unit to "DC Offset Turn-On". As for the Red Power wire, it gets connected directly to the battery and the Black Ground wire can be connected to one of the 4 bolts of the lower shelf which hold down the strap loop brackets).
This was, imo, a very straightforward install and, along with my previous addition of A-Pilar tweeters, it concludes my Emira sound system upgrade . I'm now satisfied with the overall sound improvement having more surrounding sound from the front section and, imo, the also much needed richer and deeper bass.
A special thanks to @FearGuise for his suggestions and posted pictures and hoping that you're all successful in your own sound system mods.
Great work! Would you be willing to share some pictures? Would love to see how it all looks in place.
Installed my 10" Kicker Hideaway subwoofer yesterday as an extension to the OEM sub and I'm very happy with the outcome. I placed it flush against the shelf back wall firmly stuck with velcro pieces. As @Nova mentioned in a recent post, the seat brackets are so low, and they move so far back that no component could possibly fit there. On the compromising side, the Kicker sub is compact enough as to not take up much space on the shelf and, if more space were needed, I could temporarily remove the sub by simply unplugging a single wire loom/harness.
For those interested in this mod or something similar, to make your life easier, here are the speaker wire color codes (the ones connected to the OEM sub shown in @FearGuise's earlier post):
For Left Hand Drive
White with Violet Stripe (positive) - Driver's side rear speaker
Solid Yellow (negative) - Driver's side rear speaker
Green with White Stripe (positive) - Passenger side rear speaker
Solid Blue (negative) - Passenger side rear speaker
For the 10" Kicker installation, the Solid Blue wire (REM) which is one of the wires included in the Kicker's wire harness, is not needed or useful since the Emira's OEM sound system already sends an on/off signal to the unit. All you need to do is place the switch at the bottom of the unit to "DC Offset Turn-On". As for the Red Power wire, it gets connected directly to the battery and the Black Ground wire can be connected to one of the 4 bolts of the lower shelf which hold down the strap loop brackets).
This was, imo, a very straightforward install and, along with my previous addition of A-Pilar tweeters, it concludes my Emira sound system upgrade . I'm now satisfied with the overall sound improvement having more surrounding sound from the front section and, imo, the also much needed richer and deeper bass.
A special thanks to @FearGuise for his suggestions and posted pictures and hoping that you're all successful in your own sound system mods.
Crestima, just ordered the same Kicker 10 inch sub and aim to do the same as you (mine is RHD though)
As a bit of a novice in this area, could you talk me through the steps to get the speakers and how you connect the wires (helpfully described the colours above - thank you!)
How do you remove the trim, easy to access the wires? Just splice together?
And then how did you get the red wire to the battery and the black to earth?
Any pics or guidance appreciated!
invictusmaneo
Member
has anyone verified the impedance of the dual voice coils on the factory sub? I've seen some tech specs on the factory KEF amp but don't remember the wattage on the sub channel; has that been figured out?
Great work! Would you be willing to share some pictures? Would love to see how it all looks in place.
As requested...
That looks good. Velcro straps was able to hold the weight of the sub assembly?
Crestima, just ordered the same Kicker 10 inch sub and aim to do the same as you (mine is RHD though)
As a bit of a novice in this area, could you talk me through the steps to get the speakers and how you connect the wires (helpfully described the colours above - thank you!)
How do you remove the trim, easy to access the wires? Just splice together?
And then how did you get the red wire to the battery and the black to earth?
Any pics or guidance appreciated!
Ok, let me see if I can recall the sequential steps and what I used:
1) Push forward both seats to the Max to allow as much working space in the shelf area. It's tight back there so unless you're a good contortionist, you're likely to be sitting on the door sill and leaning in to the rear shelf.
2) Remove the storage safety net.
3) Follow steps 1 -> 8 of the below pictured excerpt of the service manual.

4) Follow steps 4 ->8 of the below pictured excerpt of the service manual.

5) This is a good opportunity, with the panels already removed, to do sound proofing (I did). Borrowed picture below as example.

6) Find the wires leading in to the OEM subwoofer in the rear right quarter trim section and use 16-14 gauge T-Tap. See Amazon product pictured.

Take the 4 speaker lead wires that are attached to the Kicker harness (separate the solid grey (positive) from the grey with a black stripe (negative) and the solid white (positive) from the white with a black stripe and crimp down Spade Connectors (part of the kit above) at the end of each of the 4 speaker wires.
7) Using the 16-14 gauge T-Taps included the Kit pictured above, tap into each of the 4 speaker wires that leading into the OEM Sub. Should end up looking something like this...

8) Connect the 4 speaker wires with the Spade ends to the T-Tap female connector using this color code combination below:
For Left Hand Drive
OEM Subwoofer White with Violet Stripe (positive) -> Kicker Solid White (positive)
OEM Subwoofer Solid Yellow (negative) - Kicker White w/ Black Stripe (negative)
OEM Subwoofer Green with White Stripe (positive) -> Kicker Solid Grey (positive)
OEM Subwoofer Solid Blue (negative) -> Grey w/Black Stripe (negative).
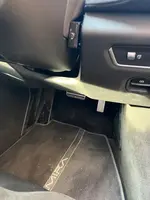
9) Drive the Red power wire from the Kicker harness to the battery in the trunk. I drilled a small hole and used a small grommet in the section pictured below, then I snaked the wire through the engine bay in through an existing grommet in the rear of the battery (with a wire loom cover to protect against excessive engine heat). Cut the excess red wire (it's really too long) and connect the fuse bridge wire (included in the Kicker kit) to the Red wired you just cut and crimp an Eyelet (also inclded in the Kicker kit) to Positive terminal of the car battery. Coincidentally, I used the same bolt to which I had my battery charger connected), but I removed the fuse beforehand as an equipment safety measure. The fuse is the included is the last thing to insert.

10) Take the Black Ground wire from the Kicker harness, crimp the last eyelet included in the kit and attach it to a metal source with good ground signal. I used one of the two small bolts holding down the rope hook bracket (the one closest to the OEM subwoofer) but I had to use a washer because the screw is very small for the diameter of the eyelet. Remember, the Solid Blue wire connected to the Kicker harness is not needed since the Kicker Sub will automatically pick up the Emira's sound system on/off signal and follow accordingly.
11) place all the panels back in reverse order, making sure to snake through no more than 10" of the harness wire loom in the mid-section between the lower shelf and the bulkhead panels.
12) Place velcro strips (not included) on the 4 rear corners of the Kicker as pictured below... It's incredible how well that Velcro sticks to the rear shed carpeting. It will definitely stay in place just with those 4 strips. You'll see what I mean when you try to pry it out.

13) In order to hide the exposed wire harness connected wires I chose to stand the Kicker upright. I'm led to believe that this is the proper orientation anyway, since the Kicker engraved letters are in this upright orientation. What is somewhat perplexing is why the unit doesn't include any sort of legs to protect from squashing the underbelly wire harness and fuse. This, however, was an easy fix the self-adhesive rubber legs bought on Amazon and pictured below.

14) Place fuse in the Red Power wire by the car battery and enjoy.
This is the step-by-step installation as best as I can recall it. Hope this is helpful to you and any other forum member.
I fitted my 10 inch amplified sub along with the tweeters, the job took 2 hours to undertake only because of the great work others have done and posted sharing all the information and experience.
The sound system is night and day different to the original system, it really is a true HI FI system now.
MANY THANKS TO EVERYONE WHO POSTED THE INFORMATION ON THIS FORUM .
.
there are no wires on display and i managed to locate the bass switch in a convenient location without the need to screw it into the trim.
The sound system is night and day different to the original system, it really is a true HI FI system now.
MANY THANKS TO EVERYONE WHO POSTED THE INFORMATION ON THIS FORUM
.there are no wires on display and i managed to locate the bass switch in a convenient location without the need to screw it into the trim.
Attachments
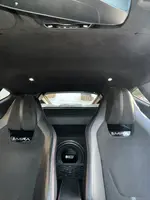
That sub is tiny! Do you think it could fit behind the passenger seat? I find no one ever pushes it back all the way anyways.
I believe it does because it's a section of the firewall where engine vibration and noise emanates the most.Sound deadening that rear panel makes a big difference?
Yes, it will fit upright, not flat behind one of the seats, but if you go that route I'd opt for the driver's seat side because, if you're the only driver, there's a much lesser chance of accidentally damaging it. Also, be sure that none of the 2 seat position memory buttons are set to go fully back.That sub is tiny! Do you think it could fit behind the passenger seat? I find no one ever pushes it back all the way anyways.
Great idea. I don’t fully extend my seat anyways. There is wasted space there.Yes, it will fit upright, not flat behind one of the seats, but if you go that route I'd opt for the driver's seat side because, if you're the only driver, there's a much lesser chance of accidentally damaging it. Also, be sure that none of the 2 seat position memory buttons are set to go fully back.
Emira Forum Images


Emira Forum Images
Similar threads
- Replies
- 5
- Views
- 730

- Replies
- 3
- Views
- 822
- Replies
- 12
- Views
- 1K

