- Thread starter
- #41
Hi WestCoastJunki,I want to place an order. How can I do that?
I'll send you a private message.
Follow along with the video below to see how to install our site as a web app on your home screen.
Note: This feature may not be available in some browsers.
Hi WestCoastJunki,I want to place an order. How can I do that?
Got it and sent you an emailHi WestCoastJunki,
I'll send you a private messaged you basck!
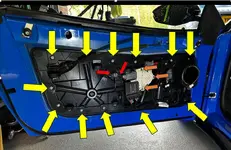
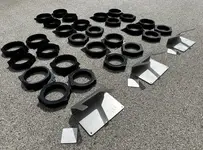
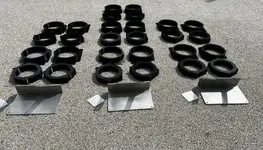
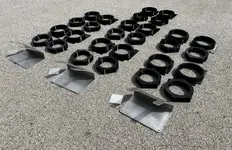
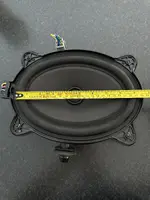
How hard was it to take the door panels apart?As promised, here are the final 3D printed versions of the front and rear speaker mounts, & Amp Mount, allowing you to upgrade your KEF audio to a far superior system. The front mounts allow you to transform from a 3" speaker to any 6.5" speaker, and the rear mounts allow you to install any far superior 5" speaker.
I’m able to produce both front and rear mounts on demand at a cost of £435 (Including postage if you’re within the UK). The mounts are 3D printed at 100% infill, not hollow or honeycomb.
The amp mount can also be produced upon request for £180, (formed from a single sheet of 5mm aluminium, plasma cut & folded into the perfect shape to mount in place of the cars original sub). All holes are pre-drilled and it’s made to take any Audison Forza amp. A 70mm Stainless-steel blanking plate (to cover the bottom free-to-air sub drain-hole).
Speaker wiring colour codes will also be included, saving you hours of time.
I’ve personally completed this upgrade to my own Emira and the difference is night and day – If you enjoy your music as much as the car, then this upgrade is definitely worth it!
I’m sure there will be many questions, and hopefully I’ll have all of the answers as the installation was completed by myself (plus taken 100’s of pictures along the way should these also be of interest).
Hi,How hard was it to take the door panels apart?
Hi KJWEmira
(1) Is it OK to PM you personally to ask some detailed questions regarding install and possibilities (choices) regarding the Emira car audio improvements?
(2) Regarding the 6.5 inch 3D printed replacement speaker mounts for the doors. I personally favor using KEF units in these spaces, and I would preferably like a 5-inch KEF compatible 3D printed part. If I paid you for designing and printing (maybe someone else would also like this?), would you consider designing/printing the nessessary part?
(3) I have still not received my i4 (ordered in summer 2021) so I have no physical vehicle to examine and explore. At times I have heard that the Emira possibly has a center channel speaker on top of the dashboard, near the windshield. Is that center channel speaker there? Or even if it isn’t; are there facilities for inserting/mounting and electrically connect such a speaker there. I think in this location the talked about 3 inch KEF unit would be the choice.
Really appreciate your work, KJWEmira
Just one more comment:
For damping material in doors and other internal spaces; I am personally interested in using the lightweight material called: ANGEL HAIR or TWARON derived from KEVLAR, and it can be obtained from MUNDORF in Germany.
I already have experience with this material for home audio speaker use; and I can vote for the sound and efficiency.
Great Job Man! can you tell me more about the Subwoofer ? did you install any as I can't see it on the list here ? honestly my main problem is that I dont like the sound of the bass in the current setup and was wondering how did you solve that ? did you install a subwoofer box behind the seat or just the above speakers ?Hertz Mille ML 280.3 - Tweeters
Hertz Mille ML 1650.3 - Front
Hertz Cento CX130 - Rear
Audison Prima APBX 10 AS2 - Sub
Audison Forza AF M8.14 bit - Amp
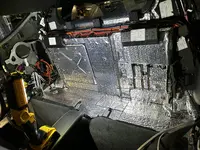
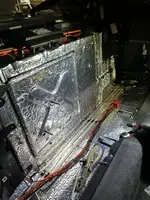
"Skinz" was used for sound deadening, then self-adhesive acoustic foam stuck on top, but only where the speakers bounce off of.
Hi Mino,Great Job Man! can you tell me more about the Subwoofer ? did you install any as I can't see it on the list here ? honestly my main problem is that I dont like the sound of the bass in the current setup and was wondering how did you solve that ? did you install a subwoofer box behind the seat or just the above speakers ?

Thanks !Hi Mino,
Yes, the sub is on the list - Audison Prima APBX 10 AS2.
It's a 10" Active sub with its own built in Amp - mounted behind the right-hand seat (on the parcel shelf). This sub also comes with an adjustable gain controller that I've mounted within easy reach of the drivers seat.
Should you install one, it'll improve your bass for sure, however, the OEM Audio issue is the size & quality of the KEF components, plus how & where they've been installed. You're not going to get much out of the 3" speakers in the front, and also there are no vocals produced from the current 5" speakers in the rear...
Finally, everyone is having to turn up the volume to the max.....I don't have this issue anymore and with the equipment installed there is zero distortion at high volume - just clear and crisp vocals and plenty of bass
Hi Mino,Thanks !
I checked with the local supplier here and these speakers and AMP all together come at an expensive cost around $3500, do you think you can recommend me other models from the same brand but lower on the category or power without compromising much on the sound ?
Anything is possible to engineer and build, however, this is the only place for an additional amp when running larger / more powerful speakers, plus keep all wiring hidden behind OEM panels. In the space you're referring to, you'd be lucky to install a 6" sub.Is it possible to build in a closed sub without taking up the parcel space? Maybe use a contour gauge or 3d scan the space to 3D print an enclosure?


You’re amazing, this is much appreciated!!@SteveFromNY
Remove all boot interior trims, and all rear cabin interior trims.
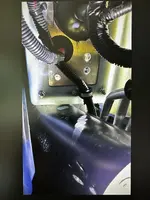
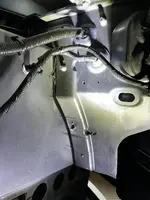
Remove left-rear wheel and wheel arch liner - With the liner removed, pictures 331 & 338 will be clearer as these are pictures of the battery / boot from the other side and show where I've drilled through to run power cables from the battery. The cables were then secured to the other power cables already running over the wheel arch. Picture 343 shows the end result and conduit fitted to all cables .
Picture 1134 is taken from inside the cabin, (left-rear). This stainless steel plate is behind the fuse box. The fuse box unbolts from its mounting frame to allow easy access. It's easier to drill this plate from the wheel arch liner side - this is the best place I found to get the power cables into the cabin.
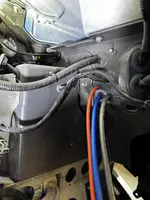
Picture 374 are the power and earth cables being fed into the cabin, & pictures 415 & 417 show where these were ran across the top of the bulk head / fire wall.
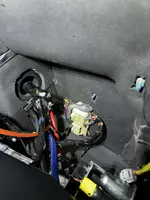
Picture 3 shows the OEM subwoofer and where I've cut the wires. This is easy to access once all rear interior trims are removed.
My suggestion - I installed my sub on the right-rear side of the parcel shelf, so as not to hinder access to the fuse box and emergency boot release cable on the left-rear. Picture 541 is of the removable engine access cover, which I removed, drilled and installed 2 bolts. This keeps my sub firmly in place while driving hard / track days.
 :
: www.cambridgecar.audio
I’m based in England, Kent, near maidstone should you wish to meet & listen to the finished article?Very impressed guys. It’s expensive getting quality upgrades but well worth it. I would love to hear what the finished product sounds like but I think you are all in the US..
You will have to keep your Emiras forever after all the hard work and money.