Custom MagSafe Wireless Charger

  • Thread Starter
  • Thread starter
  • #161
Gents check your PMs, trays are getting ready to ship!

IMG_4951.jpeg
 
Last edited:
  • Thread Starter
  • Thread starter
  • #164
Congrats on the Emira! I'll PM you.
 
  • Thread Starter
  • Thread starter
  • #165
  • Thread Starter
  • Thread starter
  • #166
Also a heads-up for anyone else not in this batch, I have 1 (potentially 2) kits left ready to go. Post here or send me a PM if you are interested.
 
Last edited:
Received and installed! Fits OEM and works great. Will see if my phone stays put during driving as it’s quite small. If needed I’ll add some kind of guides to hold it.

A few tips on installation.

1. It can be done in 20-30 min but took me over an hour just cause I’m slow.
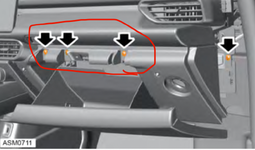
2. Rubber gasket attaches at least 2 ways. It kind of fits into the metal and then the plastic tucks under it. Easiest way to get it off is to kind of get under the lip over the plastic and pull it toward you. Take your time when refitting to make sure it is seated all the way back and everything tucked in as it should be.
3. For me it was a 2.5mm Allen wrench, not 3 as in the instructions.
4. Trim pieces come out pretty easily. This was my biggest worry because I hate pulling trim off but it was easy. The trim above the glovebox comes out really easy if you squeeze while you pull.

Have fun guys! And thanks @silent cilantro for a great kit!
 
  • Thread Starter
  • Thread starter
  • #168
Thanks for the feedback and the pointers, glad you are liking it! Yeah it will be ok, the built-in magnet should be strong enough to hold a bare phone or a magsafe case even through the alcantara. I've driven pretty spiritedly and the phone has remained in place.
 
I received mine as well. Haven't been able to install yet because the Emira is on the shop fixing a paint issue caused by the PPF installer. Will let you know when I have a chance to install the charger. Thanks!
 
Received and installed today! Everything looks well made and your instructions were clear and concise. The one thing that took the longest was screwing back in the two screws on the bottom of the glove box! Here’s where I mounted the power supply.
IMG_5184.jpeg

IMG_5183.jpeg
 
  • Thread Starter
  • Thread starter
  • #172
Awesome! Yeah, contorting into the footwell to get those 2 bolts is fun. Again, thanks for the feedback and I am glad everyone is enjoying theirs!
 
  • Thread Starter
  • Thread starter
  • #173
Just a heads up, I’m adding the Pixel 8 Pro to the list of supported devices.

- All MagSafe iPhones
- Google Pixel 8
- Google Pixel 8 Pro
- Galaxy S23/24 Ultra

1 person from the list is MIA and I have enough materials to put together 2 more kits, hit me up if you’re interested! After those sell I won’t be making more until another batch of 10 is filled.

Happy 4th! 🇺🇸
 
Last edited:
Installed my charger today. I was dreading the idea of removing a couple of the plastic pieces and breaking a tab or something. But as Steve mentioned above, the whole process was pretty easy. Looks like Lotus makes everything easy to remove and put together.

Two screws on the bottom can indeed be hard to screw back. Secret is to get under there and push the glove box firmly with one hand while tightening the screw so the holes line up.

The rubber seal on the door moves outward / to the right. I was initially trying to pull toward me and it didn’t move. When putting the rubber back, make sure to run your fingers under the rubber on the back so there is no part folding in.

Routing the charger cable out of that cubby was slightly tricky as it initially wants to go downward, but there is a very natural route going back. There is some module behind there that runs pretty hot. I’d avoid routing the cable in a way that touches whatever that is, to avoid the charger cable degrading over time.

Installation probably took me 60-70 min being pretty deliberate and careful.

Lastly, the charger is very well built and everything looks OEM! I am very happy.
 
  • Thread Starter
  • Thread starter
  • #175
Love reading these, glad you are happy @Dan C!

Are you guys trying to put the bottom screws in first before the top ones while holding the glovebox?

If so, I think it’s easier if you slot the glovebox in its place and put the top screws in loosely. Then do the bottom screws, should be easy to align since there’d still be some play. Tighten everything and good to go!


IMG_5066.jpeg
 
Love reading these, glad you are happy @Dan C!

Are you guys trying to put the bottom screws in first before the top ones while holding the glovebox?

If so, I think it’s easier if you slot the glovebox in its place and put the top screws in loosely. Then do the bottom screws, should be easy to align since there’d still be some play. Tighten everything and good to go!


View attachment 47184
I put the top screws first. Agree that leaving them a bit loose may help with the bottom screws. But none of the installation was difficult.
 
  • Thread Starter
  • Thread starter
  • #178
Glad it made it safe all the way to Down Under!

Until someone orders one from Mauritius you officially hold the record for farthest shipped charger 🤣
 
Glad it made it safe all the way to Down Under!

Until someone orders one from Mauritius you officially hold the record for farthest shipped charger 🤣
Wow! I'm honoured! haha, it actually arrived really quickly. I've just been dreading tearing the car apart since it's so new. I installed speakers, amp, subwoofer and tore up the interior in my Evora 410 but didn't want to go through all that again. Lucky the stereo is acceptable. Now just got the Milltek valve controller and then I'm good! :) I love these little quality of life things I didn't know I needed haha
 
  • Thread Starter
  • Thread starter
  • #180
Yeah people are initially hesitant about removing the glovebox (I was too fearing rattles after) but it’s really easy. I’ve had it out like 7 times and all is well.
 

Create an account or login to comment

Join now to leave a comment enjoy browsing the site ad-free!

Create account

Create an account on our community. It's easy!

Log in

Already have an account? Log in here.

Back
Top