I’m just finishing my driver side door: insulation and Alpine tweeter. First time I’ve ever done these mods. I owe it all to others who started and contributed to this thread (THANKS!!). I’ll post a few comments, in case it helps others who take on these tasks.
For those of you with a service manual, the obvious reference pages to take apart the door are 15-10 and 15-11. The not so obvious pages are 11-12 and 11-13. Those latter pages explain the trick of pushing the rubber grommets (followed by all disconnected wiring) into the inner door. They also mention disengaging 2 clips, whereas there were a lot more clips: the wiring had to be detached from all.
First off, be prepared to devote ++ time. The sound deadening install is a very tedious/detailed job. I used a combo of “rubber-backed”/foil/adhesive material (Hushmat brand) and foam/adhesive material (generic brand from Amazon). Here’s 2 photos: one showing the inside of the driver door, and the other the cabin-facing inner door card, as finished.
View attachment 61917
View attachment 61918
Reassembling the door, it was a !#\! pain in the butt, to reinstall the 3-screw window motor. I finally made it work, using 3.5” deck screws, to reach further in and snag each of the 3 white plastic inner ends (that the black screws go into), to pull the inner half of the door window assembly close enough, to carefully substitute one at a time, each black mounting screw. You know it’s worked when the inner assembly and outer motor, click into place. See photo showing 2 brown 3.5” deck screws in place, plus the one black screw installed. Using a long blade screwdriver in the gap to better wriggle the inner door motor assembly into position, also helped.
View attachment 61919
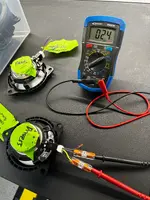
The tweeter connection wiring was a challenge, due to the restricted work space, once the protected wiring sheath, was slowly/carefully cut through to expose the wiring. Below is a photo showing the razer-edged cutting tool I used and the “medical clamp” which came in handy to pull away pieces of the cut protective wiring sheath and grab the wires. I had purchased connectors used by others but ultimately used small blue-size wireguards to join the old with new wires. Choose whatever works best for you, although some may correctly point out the wireguards aren’t waterproof.
View attachment 61922
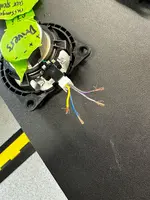
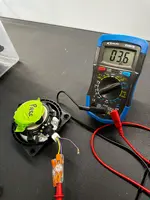
For the driver-side door (left-hand steering) I spliced into the (solid) purple wire and the blue/white wire, ID’d by others. They were found intertwined together, as shown in the attached photo. For new info, the
purple wire is the
negative one, that you attach to the negative black-lined Alpine tweeter speaker wire. I may post other tips and photos as the job progresses. Hope this helps.
View attachment 61923
 thank you!


