I think I like kitkats design better where it sort of drops off into the abyss as opposed to the border on the billet piece.Looks pretty nice. But 400 USD is a bit too much.
Navigation
Install the app
How to install the app on iOS
Follow along with the video below to see how to install our site as a web app on your home screen.
Note: This feature may not be available in some browsers.
More options
Style variation
-
📸 We've added a new feature to the site, the Showcase! You can check it out at this link: EmiraForum.com Showcase
🖼️ You can read a bit more at the announcement thread as well: Showcase -- an upgraded Journal
You are using an out of date browser. It may not display this or other websites correctly.
You should upgrade or use an alternative browser.
You should upgrade or use an alternative browser.
DIY: Floating Console Modification
- Thread starter kitkat
- Start date
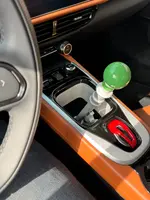
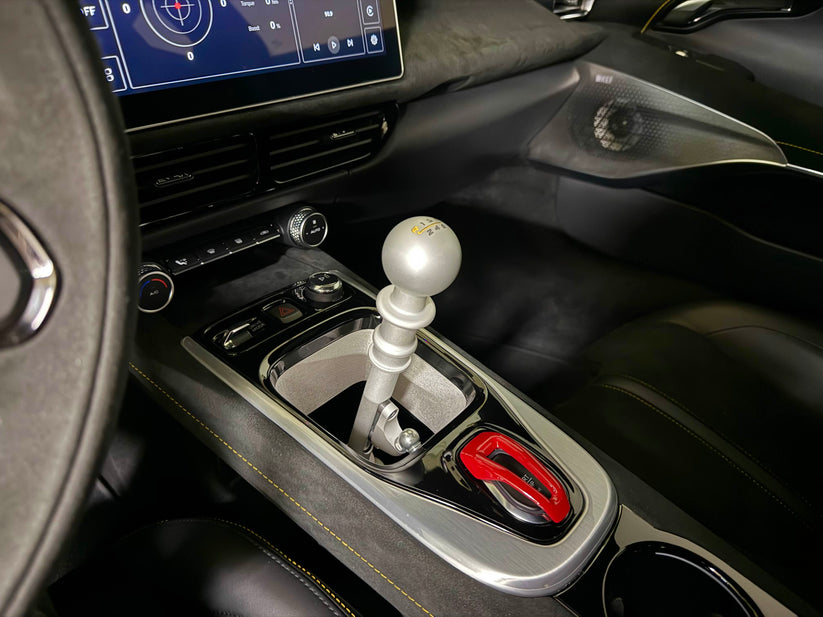
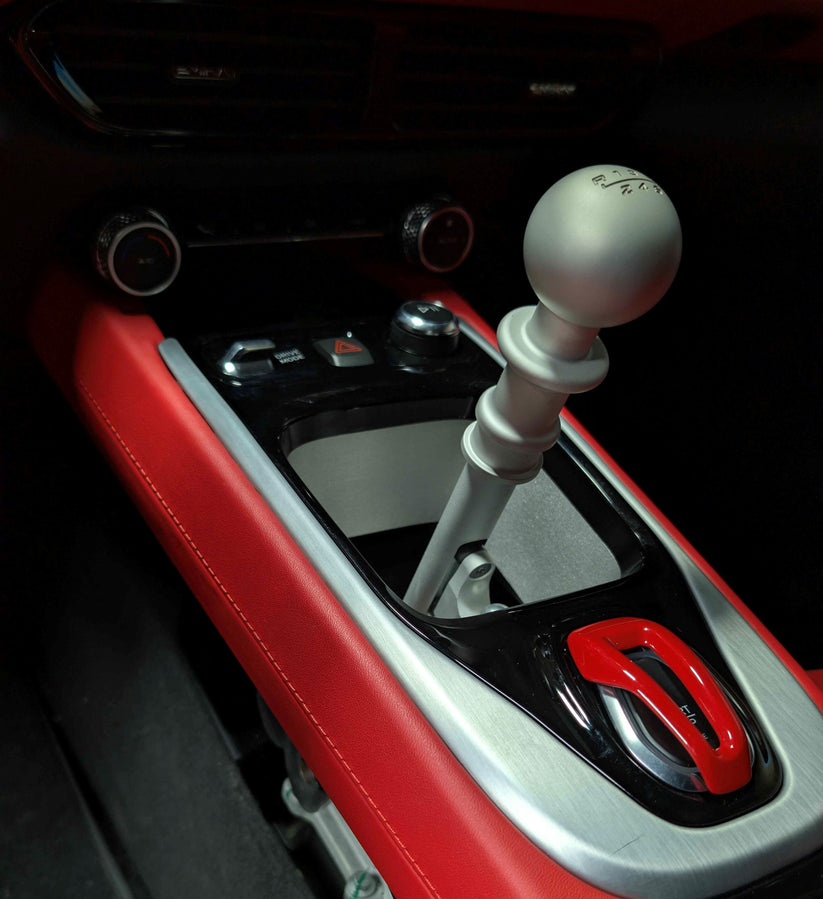
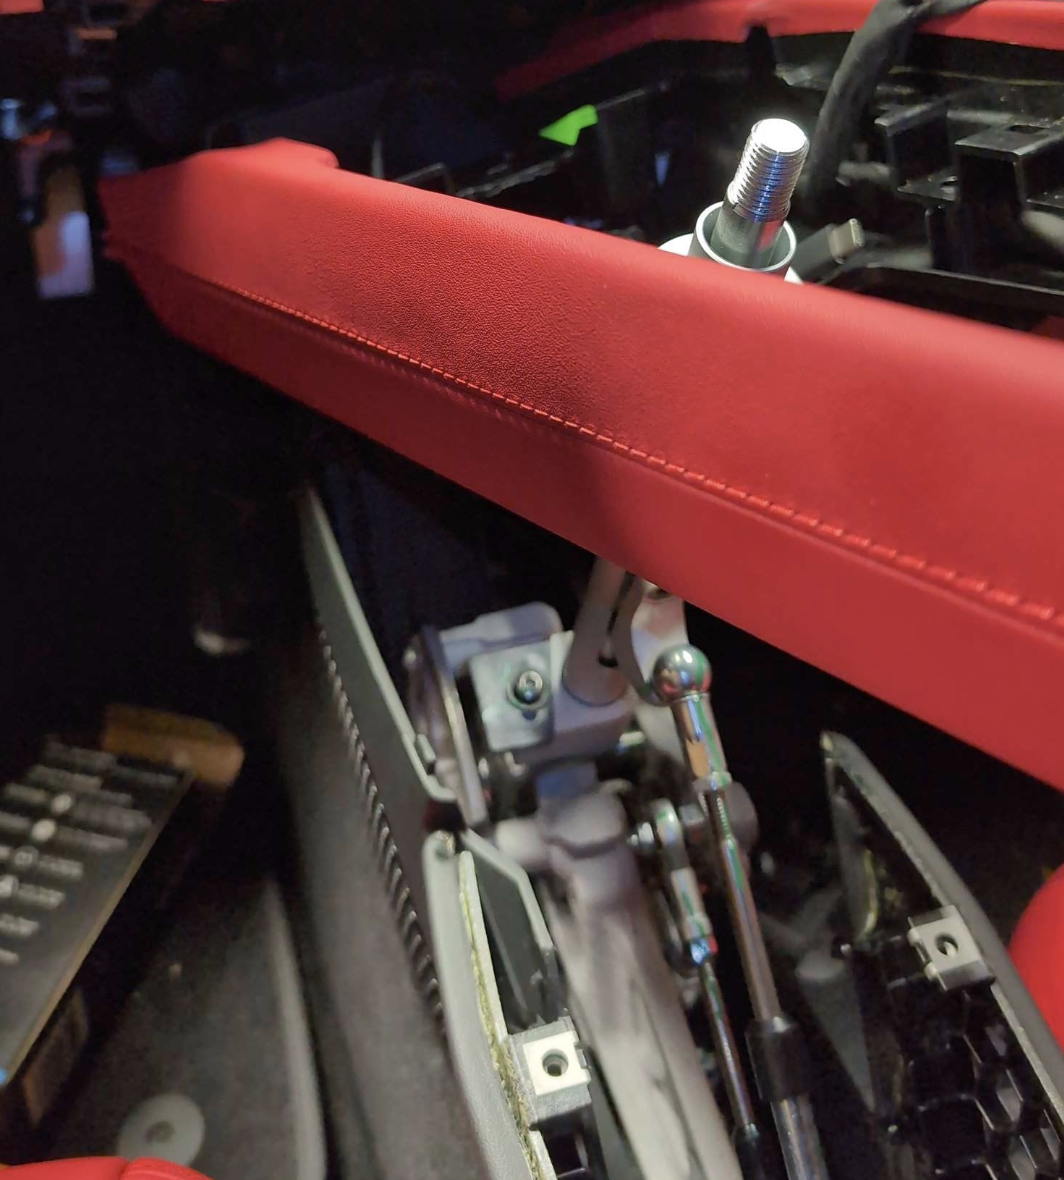
Here are some pics with it in situ.Hey now. That’s pretty. Ready for installed pics!
Attachments

ill post here with an update to the next run for interested parties.
Last edited:
- Thread starter
- #126
It has come to my attention from others that offering sales of 3d printed shifter shrouds goes against the Emira Forums vendor policies.
At this time I'm discontinuing any offers of 3d printing these for anyone on the forums.
The models are still freely available to download and use as you wish, you can upload the STL file to any 3d printing services online such as Craftcloud or Xometry and have something sent to yourself for about $50-60. Alternatively if you search your facebook marketplace I'm sure someone local to you will print any models you want out for cheap.
Completed my modification a few weeks ago. Finally got a membership to start posting here haha. Fantastic write up by KitKat and went fairly smoothly. A little bit of contortionist maneuvering to get the lower dash screws out. Had a buddy of mine print the new shroud in carbon fiber filament. Witamats sit a little high on the sides so they overlap the gap by about 1/2 inch.


Pre orders are open early for forum members here at darkworks-design.com.
picture from: Silent_Cilantro
picture from: Tomwa
picture from: Silent_Cilantro
picture from: Tomwa
Last edited:
Looks great! It goes well with the brushed aluminum trim.Pre orders are open early for forum members here at darkworks-design.com.
picture from: Silent_Cilantro
Sorry i'm being a dumb ass here but the file just come up invalid for me, what am i doing wrong?View attachment 54277
This modification deletes the shift boot, the lower shifter mesh grills, and cleans up the look down through the shifter area. It's not for everyone, but for those of us who want the original concept Emira shifter, this is basically it. Special thanks to @Tomwa & @silent cilantro for on disassembly instruction help, and thank you to @Porter for the cheerleading. These guys collaborated with me on the Lotus Discord egging me on to finish this modification up.
Tools Needed
3D Model & Printing Tips
- 2.5mm hex
- 4mm hex
- 5mm hex
- T20 torx
- Plastic trim tools
- Cable tie cutter
- Pick tool
See attachments for the Shifter Shroud - Shroud.stl.zip
View attachment 54276
Instructions
- Use PETG or a higher temp filament as this will be sitting inside your warm car potentially.
- Use supports from the build plate.
- Print with 5-7 wall loops.
- Print with 100% infill.
- Pay attention to the seam line so it isn't visible, I place it either random or I place it in the back near the cutout.
- Print time for me is about an hour and 55g of PET-CF filament.
Remove Gear Knob
- Loosen the M5x16 grub screw from the front of the gear shift knob with a 2.5mm hex key.
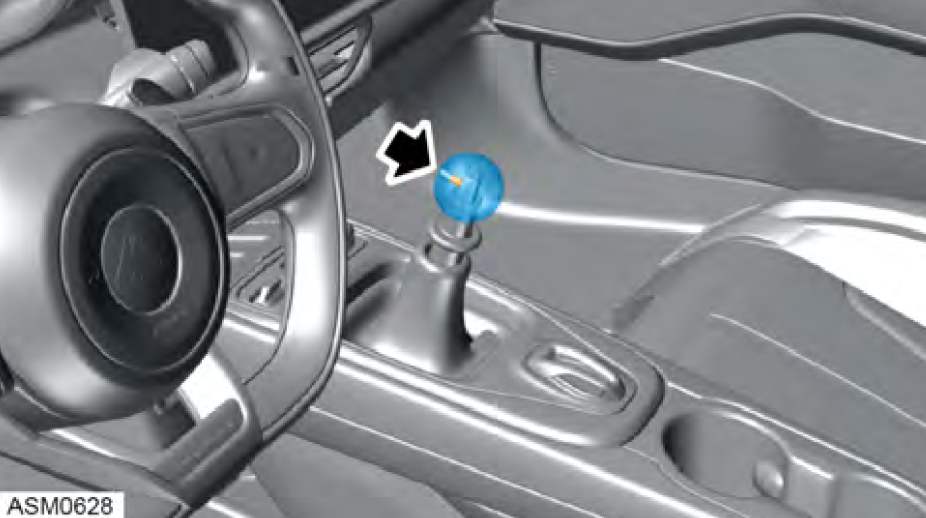
- Remove the spring and o-ring, play close attention to their orientation for later re-assembly. The o-ring fits into the shift knob recess.
Remove Engine Start Switch Panel Cover
- Remove the center console rubber pad.

- With some gloves, pull up the front plastic gloss plastic tab under the rubber mat. This is the front of the panel cover, pull it straight up.
THIS PANEL IS SHARP
- Use the trim tool to pry upwards starting from the front and working all the way back. Take care not to damage the aluminum finished plastic. Work your way left and right and backwards until the full panel can be lifted up.

- Take a set of cable ties and clip the zip tie holding the shift boot to the shift knob.
- Carefully lift the panel up and disconnect the ignition switch and set it aside. Keep in mind for reassembly the ignition switch mounts from the outside of the panel not the inside.
- Set the panel aside.
Removing Driver Side Kick Panel & HVAC Controls
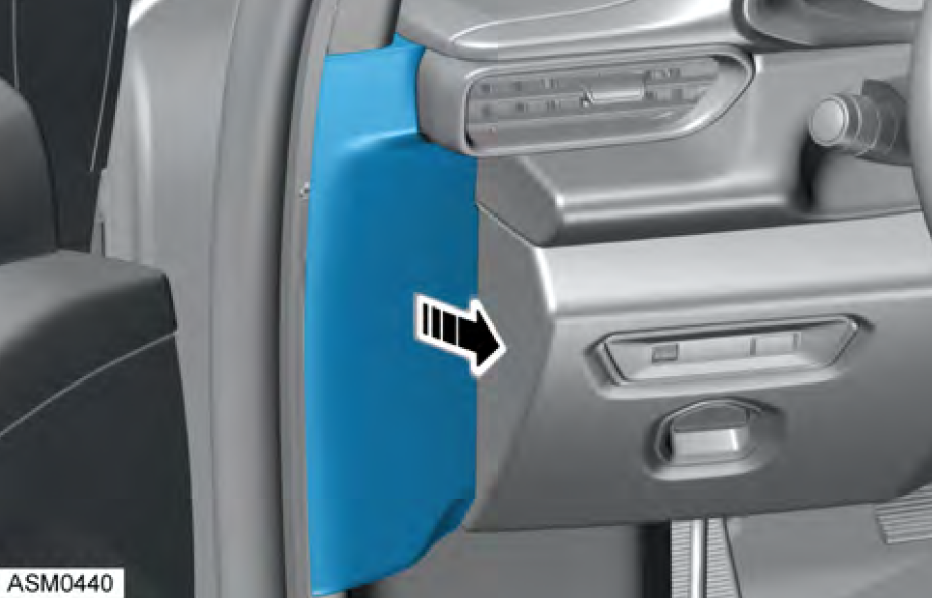
- Remove the left side dash finisher, it has two clips and pulls right off.
- Remove 3 screws, these are a mix of T20 and 4mm (maybe 5mm) hex.
- Disconnect the OBD2 port.
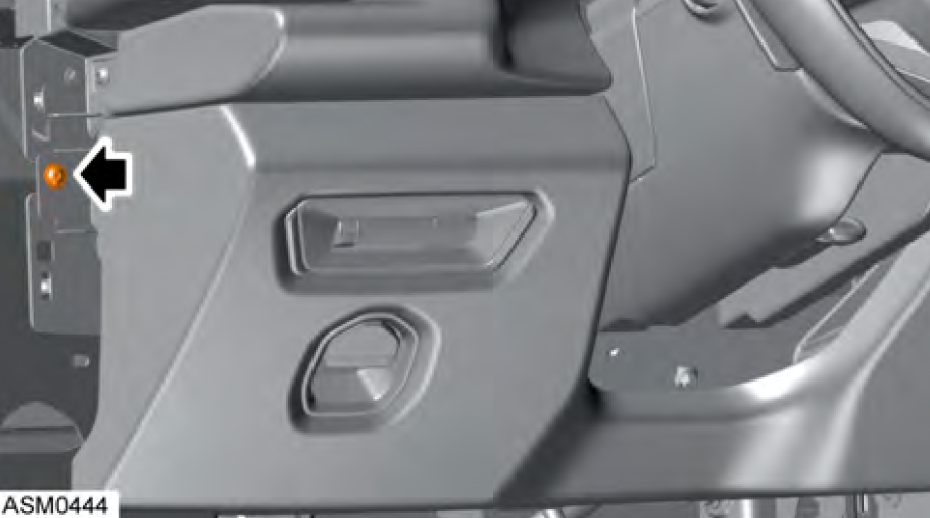
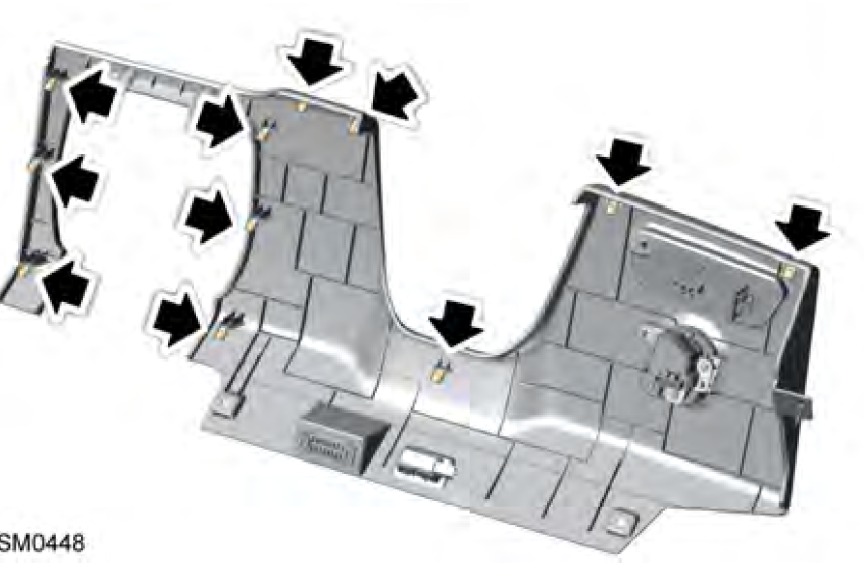
- Pull the lower kick panel straight out, 11 clips hold it in place, start from the left and work towards the right. You must be careful when reaching the skinny part over the HVAC controls to not break the panel.
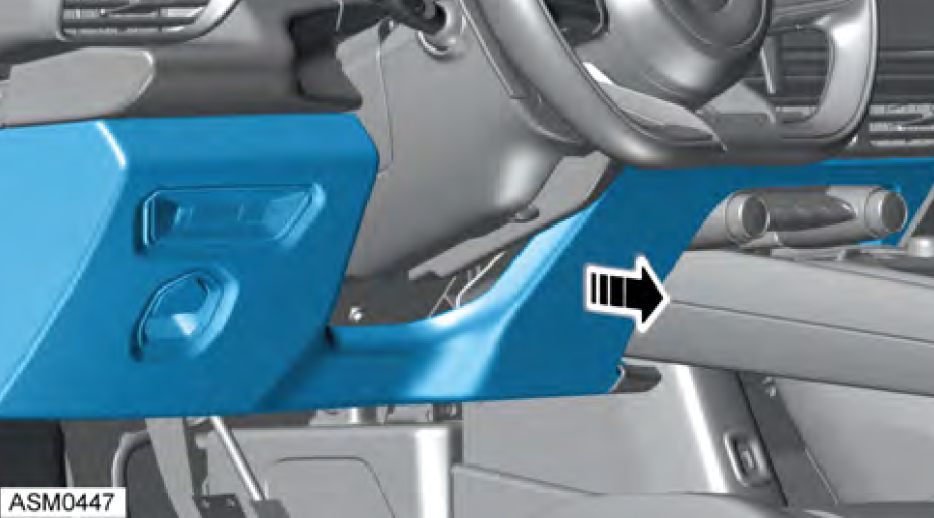
- Disconnect any wiring harnesses you might find and move the panel aside.
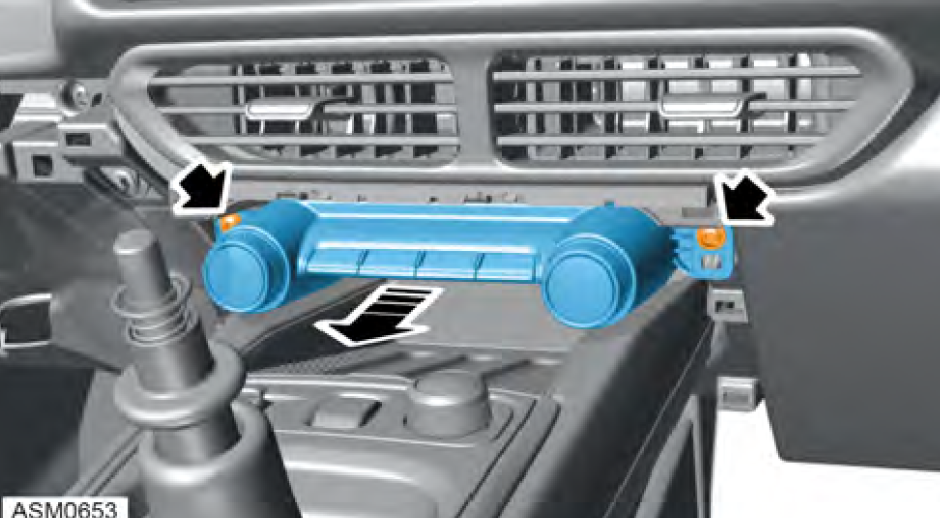
- Use a T20 to remove the two screws on each side of the HVAC controls and unclip the electrical connector.
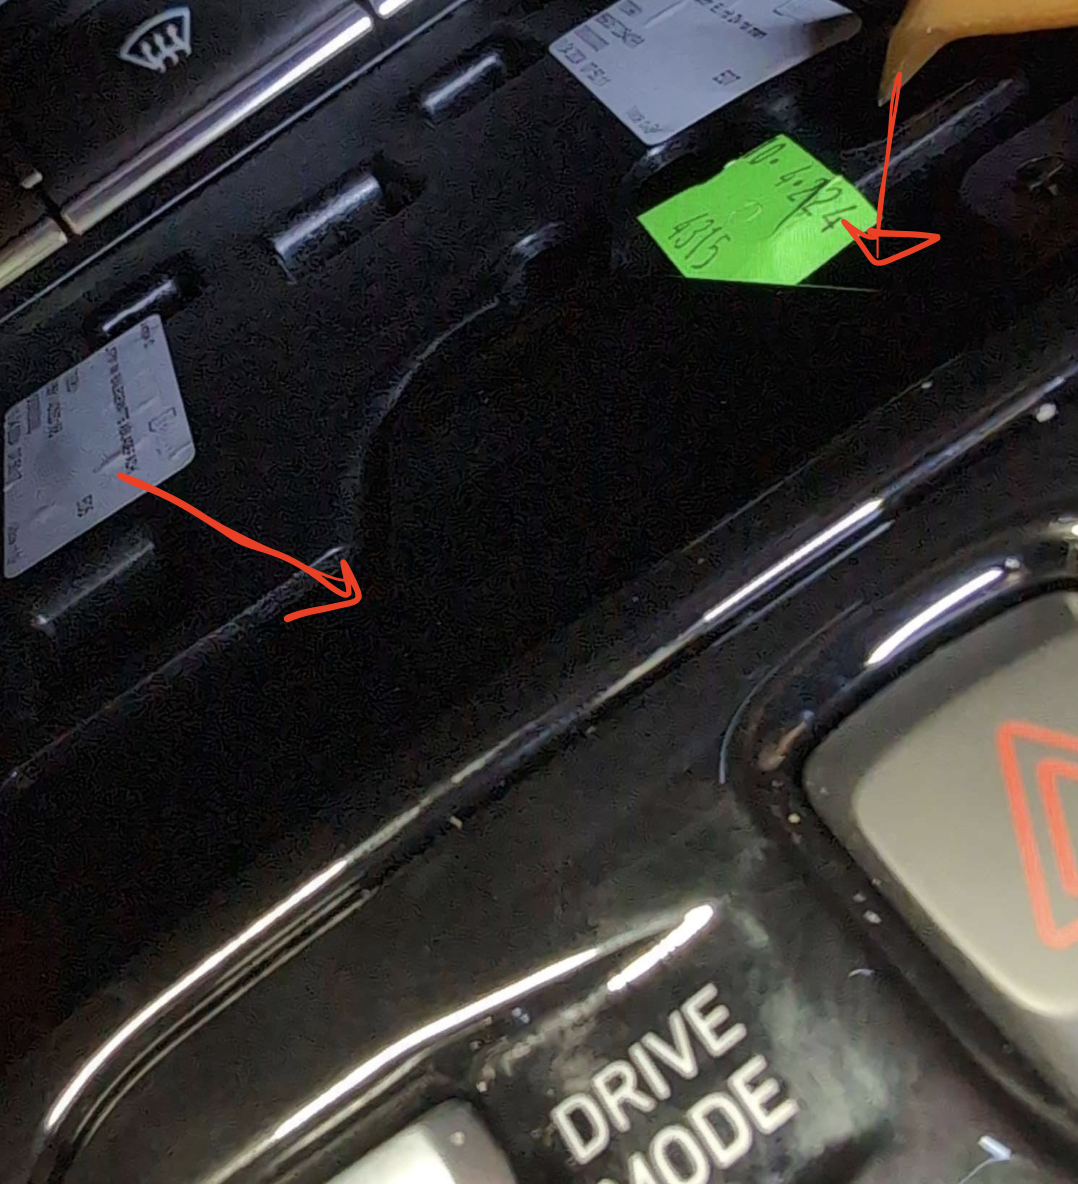
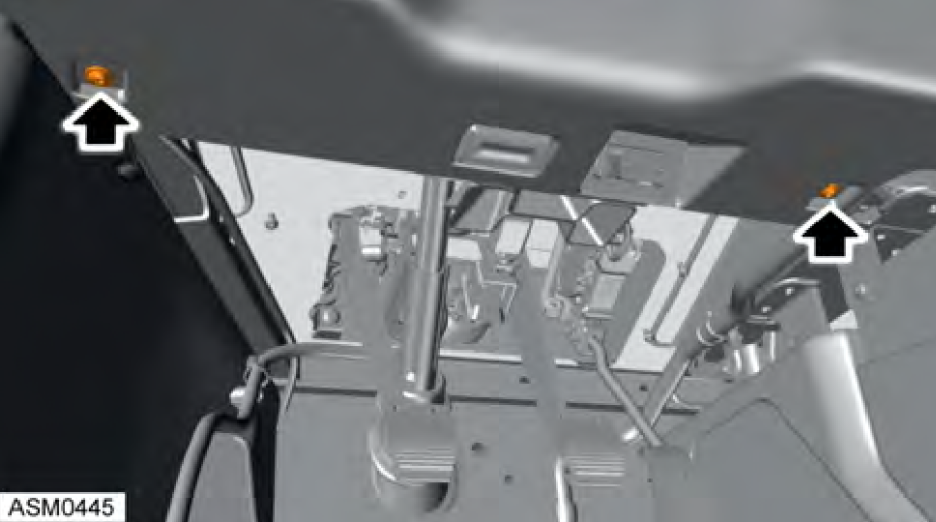
- Remove the two T20s on the side of the center console that connects to the lower dash area. They may be hiding behind two small covers shown below.
View attachment 54413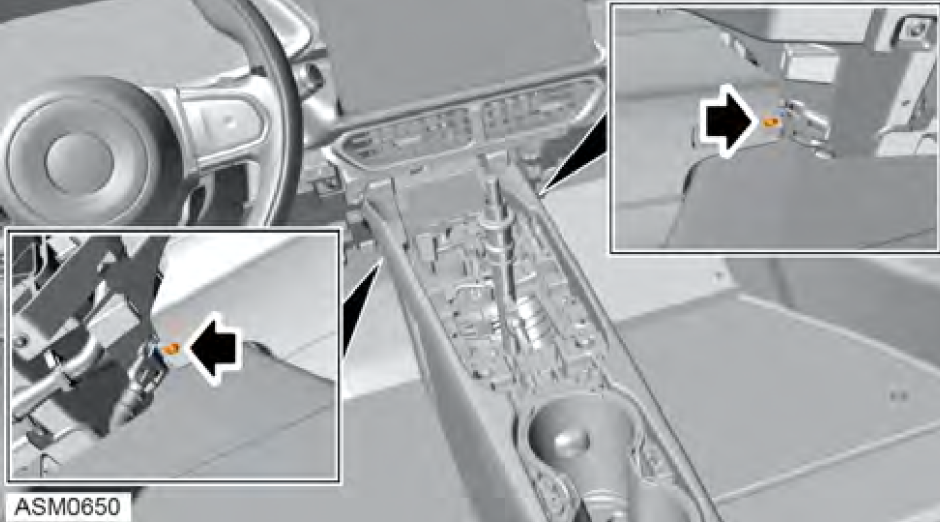
Lifting The Upper Center Console Cover
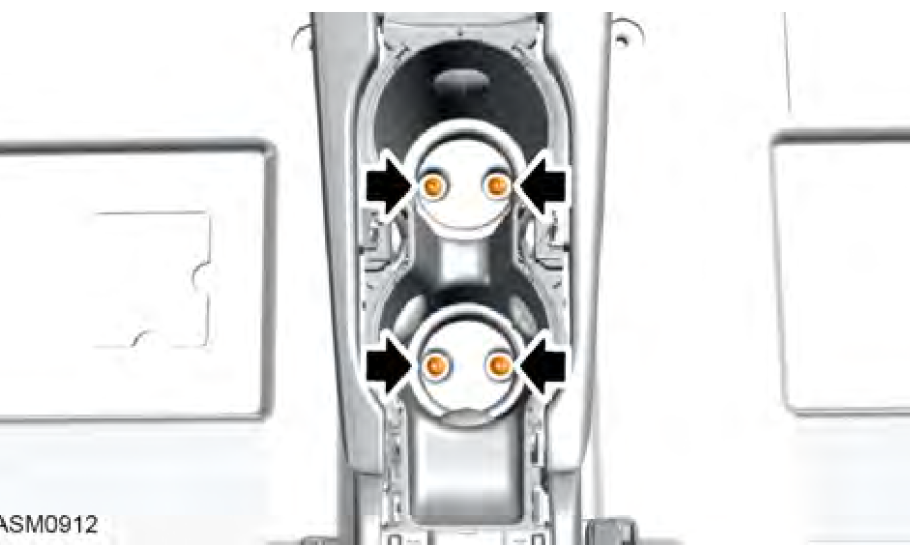
- Remove the rubber pads from the cupholders with a pick and remove the 4 screws under them with a T20, you may need a T20 with a longer extension to clear the cupholders.

- Remove the following T20 screws.
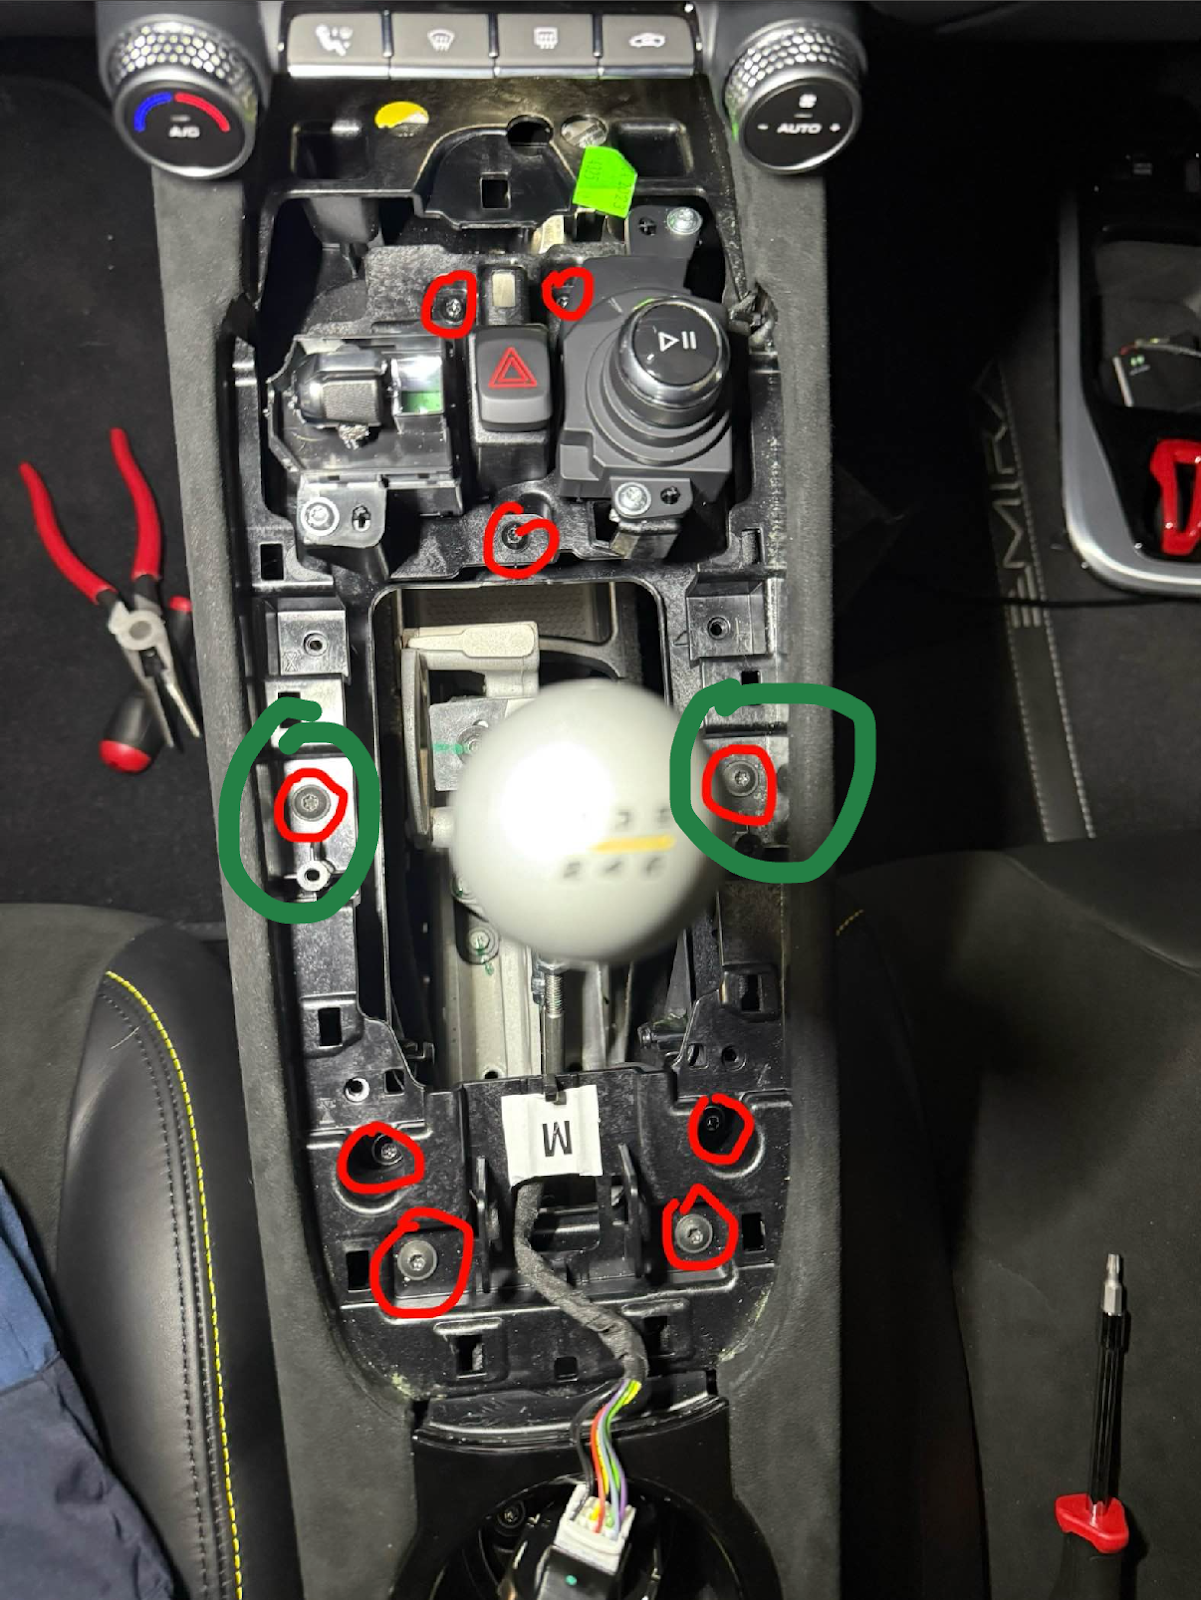
- Open the arm rest cover.
- Find the edge of the plastic piece that sits right under the edge of the arm rest cover and lift it straight up to disconnect the 4 clips under it.
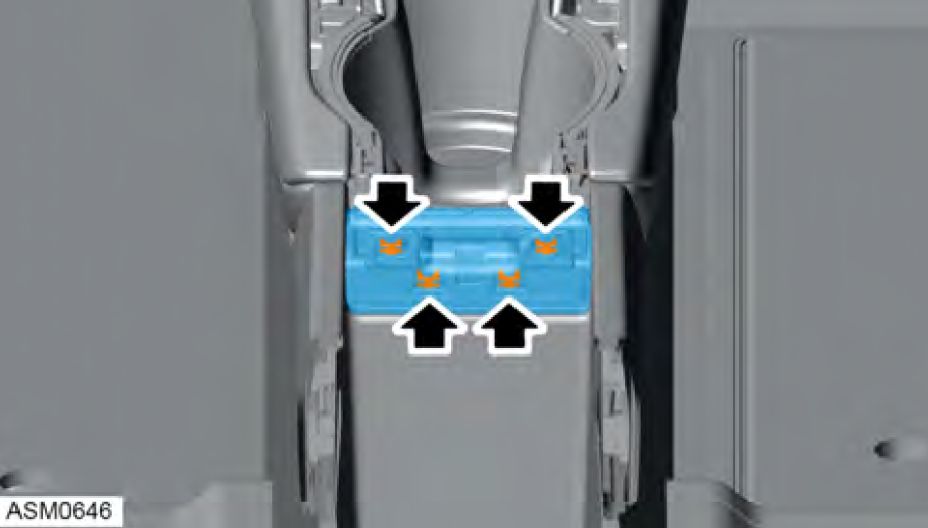
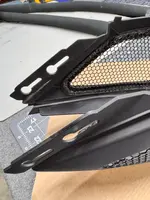
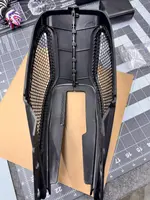
Removing the Lower Mesh Cages
- Move the driver and passenger seats all the way back.
- Lift the center console top.
- Remove the two halves of the cage from the assembly and set them aside.
Replace Shift Boot with Plastic Shroud
- Find your switch panel cover with the shift boot and flip it upside down.
- Unscrew the 4 T20 screws holding the shift boot in place.
- Swap out the shift boot with the plastic shroud.
Reassembly
- Reassembly is the opposite of assembly.
- Take your time and don’t break any clips.
- Always loosely screw in the screws, make sure fitment is spot on, and then tighten your screws.
- Make sure you plug in the OBD2 connector before you push the trim piece in.
- Thread starter
- #133
Any specific errors?Sorry i'm being a dumb ass here but the file just come up invalid for me, what am i doing wrong?
"This file is invalid for use as the following. Certificate trust list."Any specific errors?
Not something I can recall having before
Thank you kitkat
Did the mod today
Instructions were spot on. hardest part was getting the "cage" to disengage from the surrounding area.
The .stl file printed flawlessly.
This mod is kinda like having a skeleton watch. Love to mechanical things do their thing.
Did the mod today
Instructions were spot on. hardest part was getting the "cage" to disengage from the surrounding area.
The .stl file printed flawlessly.
This mod is kinda like having a skeleton watch. Love to mechanical things do their thing.
Did you try this?Is there an easy way of cutting the mesh with a dremmel and then remove it as it is not bolted in but slotted in. In not intending to put it ever back in so looking for a rather quick fix")
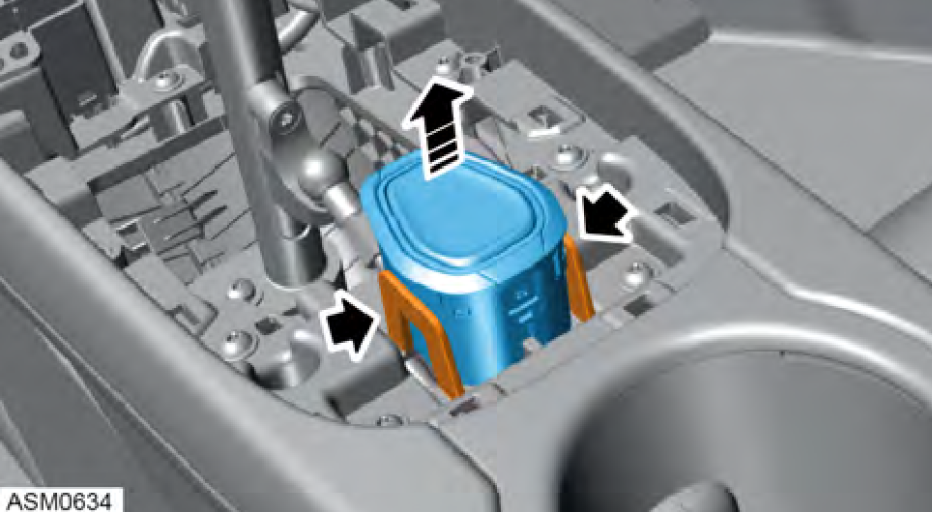
To remove the entire cage, it has to be slid up about 10mm out of a keyed grove (a slot with a hole at the top to disengage head of a plastic peg.Did you try this?
I guess you could just cut the plastic ped and cut out the rest of the cage and surround without issue
To remove the entire cage, it has to be slid up about 10mm out of a keyed grove (a slot with a hole at the top to disengage head of a plastic peg.
I guess you could just cut the plastic ped and cut out the rest of the cage and surround without issue
Attachments
Nope i followed the full removal.. but it can be done. If you want can sent you detailed pics where to cut what.. if id know id done it, its a hassle to remove everything losing clips etcDid you try this?
Emira Forum Images


Emira Forum Images
Similar threads
- Replies
- 55
- Views
- 8K
- Replies
- 6
- Views
- 565
- Replies
- 12
- Views
- 452
- Replies
- 39
- Views
- 6K

