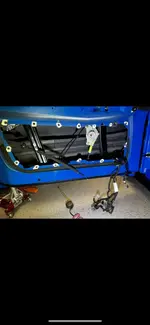
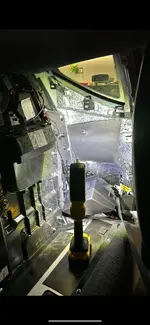
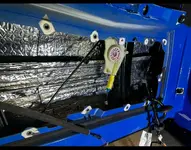
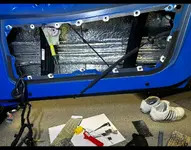
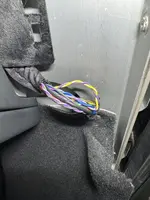
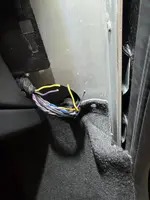
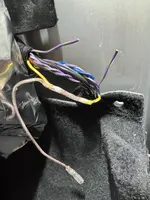
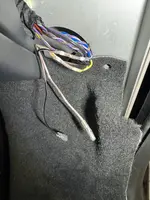
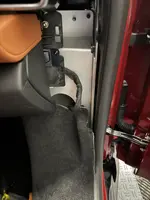
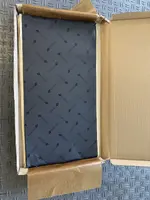
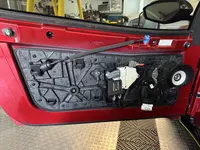
Initial Results after adding Tweeters

  • Thread Starter
  • Thread starter
  • #41
MANY THANKS Chriscpm (!!) for starting this thread, then filling in details and answering questions. Like others, you've convinced me to do this mod, since I love listening to "car tunes" (lol), see this as something I can do, for an affordable price (Can$168 for the Alpine tweeters I just purchased off amazon.ca). That said, while I'm inside the door, I may as well install some sound deadening insulation. The amazon link you posted above, doesn't work for me for some reason. But I pulled off the "item number" from the unworkable (for me) link, which after searching amazon.com, suggests it's the:

394mil Thickened Sound Deadener for Cars - Aluminum Foil Foam Noise Deadening Material - Heat Shield Hood Insulation Dampening Mat 6sqft​


For US$14.99 (394 mm thickness and 6 square feet); is that correct?

I'm hoping that's it, since I can buy the same product on amazon.ca for (as usual) an increased price (Can$26.99).
That sounds right. In my c8, the product was thinner and denser. Any sound deadening material works.
 
Can we get a single write up with the installation instructors and wiring pictures for us noob modders? 🙏 ala Kit Kat's installation guide for the shifter
 
  • Thread Starter
  • Thread starter
  • #43
Thanks everyone.

If I were to add a subwoofer, the amp I have taps into speaker level signals then converts. It's an LC2i. It works well for shaping the bass. I'd like to get some of that goofy mid-bass out of there.

My plan was to tap the back speakers, then just turn dun the overall bass (probably way down) in the Emira screen. Then bring back using the sub.

Is there a smarter way?
 
  • Thread Starter
  • Thread starter
  • #44
Can we get a single write up with the installation instructors and wiring pictures for us noob modders? 🙏 ala Kit Kat's installation guide for the shifter

I did my pictures after the fact. In hindsight, I would have done a better job.


@crestima

is going to do his soon. I live by him. I'll see if he would like me to stop over when he does his. Then we can do better docs.
 
I did my pictures after the fact. In hindsight, I would have done a better job.


@crestima

is going to do his soon. I live by him. I'll see if he would like me to stop over when he does his. Then we can do better docs

Sounds like a plan @Chriscpm. I should receive the tweeters and Second Skin sound deadening by Friday, so perhaps we can coordinated for this coming weekend, if it works for you. Btw, here's a picture of the A-pilar trim removal taken from the service manual. Only 2 clips holds it in place.

IMG_1505.jpeg
 
Last edited:
I'm curious to know how much sound deadening material is needed for both doors, assuming one should buy a bit more than actually used, to be on the safe side. The material that Chriscpm looks to have purchased off Amazon, is described as 6 square feet. Was that enough or was more than one package purchased?

I've never done this "sound deadening" mod before. The more I read about it, the more it looks like an endless audiophile rabbit-hole. Not only do different materials supposedly handle different sound frequencies, with manufacturers touting the virtues of their own product when it comes to ease of use and effectiveness, but some users complain some materials don't "stick" enough or they're so "sticky" it's almost impossible and very messy to work with or remove. Then we have the issue of WEIGHT being added which can be a sore spot for many. Some manufacturers claim their high cost is justified when their product is thin and doesn't weigh as much, yet still very effective. Others say you can't get good sound deadening, unless the material(s) is physically thick. Sigh. Ideally, it would be nice to find that perfect balance between sound cancellation effectiveness, weight and cost, for your "average buyer" (like me) who's not seeking perfection.

The Youtube videos, as usual, appear "suspect" with some reviewers looking to favour certain products. Other than many saying THE recognized manufacturer in this area is Dynamat, which has been around a very long time, a more recent competitor looks to be ResoNix, but both are very pricey, especially for someone in Canada looking at the US exchange rate and cross-border ship cost. Then there's Kilmat, Siless and a host of others, all of which get varying degrees of approval amongst reviewers. Locally and aside from what I can get off Amazon, and ignoring paying a local audiophile business a ton of money to do this for me, one of my only other choices appears to be Hushmat, which I can buy from an automotive performance retailer.

That said, I expect I'll follow the suggestion of Chriscpm and use anything that looks OK, to improve the Emira sound and the new Alpine tweeters I've purchased. Sorry for the length of this post...I should have stopped after the first paragraph (lol).

PS to crestima: thanks for your post on the thread and volunteering to provide further directions. Much appreciated and I look forward to same.
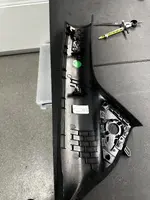
 
I heard about this. Does the whole pillar just pry off?
Yes, it will pry off - but be cautious due to the airbag.

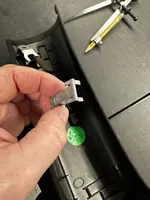
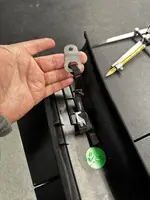
Use a plastic trim tool and insert at the top of the A-Pillar trim, and in the center. The trim will only pry off a little way (approx 3 cm) because a large metal retaining clip will prevent it from coming off any further (see attached pics).
Use a set of needle nose pilers from the top to squeeze this metal clip together to remove it (if you just pull, you'll deform it..).

Finally, I believe all cars have had the A-Pillar tether upgrade by now (see pic 0184)- This is a strap securing the trim to the car which prevents it from flying off in the event of airbag deployment. All you need to do is remove the 8mm bolt from the cars' A-Pillar.
Don't worry should this strap not be present, Lotus will install this for free as part of a service bulletin.

(If you zoom in, you'll see the speaker grill metal tabs folded over in Pic 0180 which I referred to in my previous message).
 

Attachments

  • IMG_0180.jpg
    IMG_0180.jpg
    431.8 KB · Views: 23
  • IMG_0181.jpg
    IMG_0181.jpg
    361.5 KB · Views: 23
  • IMG_0182.jpg
    IMG_0182.jpg
    292.1 KB · Views: 24
  • IMG_0184.jpg
    IMG_0184.jpg
    378.7 KB · Views: 23
I'm curious to know how much sound deadening material is needed for both doors, assuming one should buy a bit more than actually used, to be on the safe side. The material that Chriscpm looks to have purchased off Amazon, is described as 6 square feet. Was that enough or was more than one package purchased?

I've never done this "sound deadening" mod before. The more I read about it, the more it looks like an endless audiophile rabbit-hole. Not only do different materials supposedly handle different sound frequencies, with manufacturers touting the virtues of their own product when it comes to ease of use and effectiveness, but some users complain some materials don't "stick" enough or they're so "sticky" it's almost impossible and very messy to work with or remove. Then we have the issue of WEIGHT being added which can be a sore spot for many. Some manufacturers claim their high cost is justified when their product is thin and doesn't weigh as much, yet still very effective. Others say you can't get good sound deadening, unless the material(s) is physically thick. Sigh. Ideally, it would be nice to find that perfect balance between sound cancellation effectiveness, weight and cost, for your "average buyer" (like me) who's not seeking perfection.

The Youtube videos, as usual, appear "suspect" with some reviewers looking to favour certain products. Other than many saying THE recognized manufacturer in this area is Dynamat, which has been around a very long time, a more recent competitor looks to be ResoNix, but both are very pricey, especially for someone in Canada looking at the US exchange rate and cross-border ship cost. Then there's Kilmat, Siless and a host of others, all of which get varying degrees of approval amongst reviewers. Locally and aside from what I can get off Amazon, and ignoring paying a local audiophile business a ton of money to do this for me, one of my only other choices appears to be Hushmat, which I can buy from an automotive performance retailer.

That said, I expect I'll follow the suggestion of Chriscpm and use anything that looks OK, to improve the Emira sound and the new Alpine tweeters I've purchased. Sorry for the length of this post...I should have stopped after the first paragraph (lol).

PS to crestima: thanks for your post on the thread and volunteering to provide further directions. Much appreciated and I look forward to same.
Hi There,

I used "Skinz" sound deadening, then stuck acoustic foam over the top.
Skinz has an adhesive backing that requires heating up to stick. It comes in easy to handle & cut square pieces. I used 1 & 1/2 boxes - each box cost 100 GBP.
Yes, this will add some weight, around 10-12kgs, if you did both doors and the whole of the rear compartment.
But it's worth it - no more stone flicking up noise, you can have a conversation with the passenger, can take phone calls, music sound is far improved etc - although I've fully upgraded the audio.

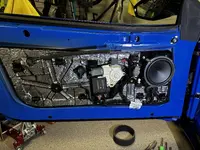
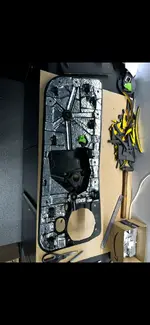
Installing sound deadening took the longest amount of time to execute, around 7 days (not solid days)....But I did the plastic door cards too as you'll see from the pictures attached.
 

Attachments

  • IMG_0487.jpg
    IMG_0487.jpg
    460.3 KB · Views: 25
  • IMG_2405.PNG
    IMG_2405.PNG
    759 KB · Views: 25
  • IMG_2404.PNG
    IMG_2404.PNG
    1.1 MB · Views: 26
  • IMG_2403.jpeg
    IMG_2403.jpeg
    176.7 KB · Views: 27
  • IMG_2402.jpeg
    IMG_2402.jpeg
    111.4 KB · Views: 26
  • IMG_2400.jpeg
    IMG_2400.jpeg
    211.2 KB · Views: 26
  • IMG_2399.jpeg
    IMG_2399.jpeg
    215.6 KB · Views: 24
  • IMG_2398.jpeg
    IMG_2398.jpeg
    395.7 KB · Views: 23
  • IMG_2397.jpeg
    IMG_2397.jpeg
    458.7 KB · Views: 23
Yes, it will pry off - but be cautious due to the airbag.

Use a plastic trim tool and insert at the top of the A-Pillar trim, and in the center. The trim will only pry off a little way (approx 3 cm) because a large metal retaining clip will prevent it from coming off any further (see attached pics).
Use a set of needle nose pilers from the top to squeeze this metal clip together to remove it (if you just pull, you'll deform it..).

Finally, I believe all cars have had the A-Pillar tether upgrade by now (see pic 0184)- This is a strap securing the trim to the car which prevents it from flying off in the event of airbag deployment. All you need to do is remove the 8mm bolt from the cars' A-Pillar.
Don't worry should this strap not be present, Lotus will install this for free as part of a service bulletin.

(If you zoom in, you'll see the speaker grill metal tabs folded over in Pic 0180 which I referred to in my previous message).
Very, very helpful instructions. Thank you.
 
Hi Folks,

This is a bit long and with a few pictures so will have to Post in sections

PART 1
I finished installing my A-pilar tweeters yesterday and the sound improvement is definitely noticeable and worthy of the mod. A big thanks to @Chriscpm for kicking off this initiative and for the input of others, namely @Nova and @KJWEmira .

I purchased the same tweeters as @Chriscpm, they fit perfectly in the A-pilar housing. The extra additional step that I recommend for anyone installing the A-pilar tweeters, is to also place sound deadening material in the internal parts of the doors and the black trim panel pursuant to @KJWEmira's previously posted pictures. IMO, this not only further improves the sound output of door-mounted speakers, but also noticeably reduces road/tire noise from penetrating the cabin. There are lots of good sound deadening material offered out there, I tend to like 1mm Second Skin due to ease of installation good adhesion and lightweight characteristics. Not a very difficult job, but to do an effective job, it requires lot's of time and patience.

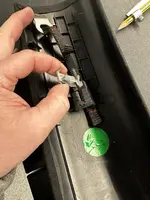
Btw, as you follow KJW's A-pilar trim removal instructions for which he provided useful pictures above, keep in mind that for the second stage pull , after you've pinched the top metal tab, will require a good amount of pull force to get them out. A very convenient tool that I used helped a lot to pinch squeeze the metal tab was this surgical clamp (pictured here) as it's longer than needle nose pliers and locks closed allowing you to use your two hands to pull on the A-plilar trim.


IMG_1553.jpeg

If you happen to bend/deform the small winglets on the upper metal tab (as I did to one of them) they can easily be pried back to their original form with a needle nose plier.

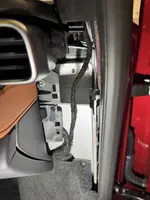
Here are some additional pictures to those already provided by @Chriscpm which you may find helpful.

IMG_1523.jpegIMG_1524.jpeg
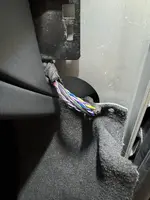
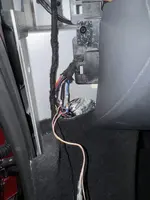
(passenger side) Take your time and be extra careful in opening and cutting through the wire cloth tape to ensure you don'y accidentally cut unwanted wires. These bunched up wrapped wires are very thin. The yellow/white stripe and purple/green stripe tweeter wires are easily identified as they are braided together.
 
Last edited:
PART 2
IMG_1525.jpegIMG_1526.jpegIMG_1554.jpeg

I used solder seal connectors and about 10" of the crossover filters' end wires that came with the Alpine kit and since I didn't use the filters like @Chriscpm, these end wires were very handy since they already come with the end tab connectors to the tweeter wires.

IMG_1520.jpegIMG_1544.jpeg
(Drivers side) The Blue/white stripe and purple wires are also braided together.

IMG_1543.jpegIMG_1531.jpeg
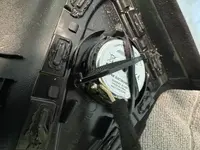
I drilled a small hole in each of the 4 corner plastic tabs with a 1/8" drill bit to pass through the zip small ties to secure the tweeters firmly in the bracket. and then used the foam that came with the Alpine kit to protect the rear of the tweeters (not pictured). Second picture above- I connected and wrapped up all the tweeter wires with cloth tape to protect and seal them.
 

Attachments

  • IMG_1519.jpeg
    IMG_1519.jpeg
    220.9 KB · Views: 5
PART 3 (Final)

IMG_1550.jpegIMG_1551.jpeg
I used 1mm Second Skin Sound Deadning material placed firstly in the inside of the doors (not pictured) and then on the black door trim panel (pictured). The result was very similar to @KJWEmira's Seneca Blue previously posted pictures.

Hopefully, you'll find these pictures/guidance steps, along with those already posted by @Chriscpm and @KJWEmira to be useful should you also decide to also perform this mod. Happy to help with any clarification if needed.
 
Super useful thanks for taking these photos and putting the work in on the write up. I’m definitely going to figure out this mod.

I’m curious about the wires you tapped into. I believe Chris tapped into the midrange wires - did you tap into those or did you tap into the tweeter wires?
 
Super useful thanks for taking these photos and putting the work in on the write up. I’m definitely going to figure out this mod.

I’m curious about the wires you tapped into. I believe Chris tapped into the midrange wires - did you tap into those or did you tap into the tweeter wires?
Good question, and I should have mentioned it. I did test one Alpine tweeter on the passenger side by tapping first into the midrange wires and then into the tweeter ones. For the test, I used T Tap connectors to avoid cutting, having to reconnect and minimize wire cover damage. And the result? Frankly, my ears could not discern a difference in either output power or sound quality between the two, so ultimately, I opted to tap into the OEM tweeter wires.
 

Create an account or login to comment

Join now to leave a comment enjoy browsing the site ad-free!

Create account

Create an account on our community. It's easy!

Log in

Already have an account? Log in here.

Aerie Performance Lotus Emira Carbon Fiber Parts GregsRaceParts.com BanC Tech JUBU Performance Jon Seal Sportscars

Latest posts

Back
Top