Yes. You will have 2 options. Wide open and completely closed (vs the progressive opening in the various drive settings). The wide open setting is more aggressive sounding than higher RPM track mode setting. The valve closed setting is quiet even with the 3rd cat removed. I programmed my homelink to operate the valve opening/closing. It is plug and play.So with the milltek controller we can turn it completely off and make it sound stock, right?
Navigation
Install the app
How to install the app on iOS
Follow along with the video below to see how to install our site as a web app on your home screen.
Note: This feature may not be available in some browsers.
More options
Style variation
You are using an out of date browser. It may not display this or other websites correctly.
You should upgrade or use an alternative browser.
You should upgrade or use an alternative browser.
GRP Emira Decat Pipes Now Available!
- Thread starter GRP
- Start date
- Thread starter
- #62
With the controller you can close the valve 100% of the time or you can open it 100% of the time. It overrides the mode selection.So with the milltek controller we can turn it completely off and make it sound stock, right?
With the decat it will increase the volume with the valve open or closed but when it’s closed it will still quiet down quite a lot with the stock muffler.
It’s about a 20-25% increase in volume with the decat installed.
freefall_junkie
Emira Fiend
Sounds great. I'm installing mine on Tuesday and I'll provide feedback here but from what I've heard from others, it's a nice difference in sound.
BTW Thanks for the tootsies, @GRP, my 2 y/o daughter LOVED them!
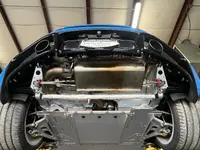
Interested to hear how others get on with DIY fitting of the decat. It was far harder and took way longer than I was expecting. I did it without removing the lower rear bodywork. In hindsight this was a mistake as it proved almost impossible to get the cat free from the silencer this way, at least not without skinned knuckles and a lot of swearing
Agree. Detailed instructions and video would be much appreciated.Interested to hear how others get on with DIY fitting of the decat. It was far harder and took way longer than I was expecting. I did it without removing the lower rear bodywork. In hindsight this was a mistake as it proved almost impossible to get the cat free from the silencer this way, at least not without skinned knuckles and a lot of swearingIf I was doing it again I would probably bite the bullet and remove the bodywork. No doubt GRP will show us all the smart way to do it!
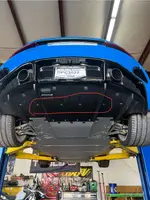
I would not attempt this without having access to a lift (I borrowed one). In addition to removing black plastic under-tray, I had to disconnect the following:Interested to hear how others get on with DIY fitting of the decat. It was far harder and took way longer than I was expecting. I did it without removing the lower rear bodywork. In hindsight this was a mistake as it proved almost impossible to get the cat free from the silencer this way, at least not without skinned knuckles and a lot of swearingIf I was doing it again I would probably bite the bullet and remove the bodywork. No doubt GRP will show us all the smart way to do it!
drivers side end link
Both sway bar mounting brackets
Both exhaust hangers
Access is really tight to the upper nut above the 3rd cat even with it on a lift. I still had a hard time getting the exhaust out due to the length of pipe going out of the driver side exhaust tip. Be careful not to bend the aluminum underbody panel tabs. As for removing panels, I only removed the plastic under-tray. I learned the hard way that you don’t need to remove the middle 4 bolts in the center of the plastic under-tray to remove it from the car. Those 4 bolts secure the metal support bar to the plastic.
There is no way that I could have removed the cat without taking out the entire exhaust. The angle that I had remove would have been extremely difficult to accomplish not on a lift. The cat was FIRMLY pressed into the other pipe. It took a me putting the exhaust on a spare tire and a second person (local power lifting champion) a solid 5 minutes to muscle it off.
Use caution when installing the decat pipe. The bolt going through the band clamp welded onto the stock exhaust is junk. It will snap in half if you torque too hard. Apparently, 2 ugga duggas at 50 ft/lbs is all it takes to snap.
It is a worthwhile mod. Your mileage may vary for installation. Hopefully the tips help someone else avoid some headaches.
Attachments
Last edited:
Exactly my experience trying to do it on my patio by myself.Interested to hear how others get on with DIY fitting of the decat. It was far harder and took way longer than I was expecting. I did it without removing the lower rear bodywork. In hindsight this was a mistake as it proved almost impossible to get the cat free from the silencer this way, at least not without skinned knuckles and a lot of swearingIf I was doing it again I would probably bite the bullet and remove the bodywork. No doubt GRP will show us all the smart way to do it!
The silencer is prevented from going backwards or downwards by the exhaust finishers and the cat can’t go forward without hitting the subframe.
If you have access to a car lift and two burly blokes to wriggle apart the silencer and cat then it’s possible but it’s a PITA and the heatshield will take a battering.
I ended up biting the bullet that you described, definitely easier in the long run.
I’m very impressed with your determination and ability to unistall/reinstall on jackstands.Exactly my experience trying to do it on my patio by myself.
The silencer is prevented from going backwards or downwards by the exhaust finishers and the cat can’t go forward without hitting the subframe.
If you have access to a car lift and two burly blokes to wriggle apart the silencer and cat then it’s possible but it’s a PITA and the heatshield will take a battering.
I ended up biting the bullet that you described, definitely easier in the long run.
View attachment 38886
Seriously, well done.
Last edited:
Whoa! Did you really need to take the whole bumper off? Or is the lower section not removable on its own?Exactly my experience trying to do it on my patio by myself.
The silencer is prevented from going backwards or downwards by the exhaust finishers and the cat can’t go forward without hitting the subframe.
If you have access to a car lift and two burly blokes to wriggle apart the silencer and cat then it’s possible but it’s a PITA and the heatshield will take a battering.
I ended up biting the bullet that you described, definitely easier in the long run.
View attachment 38886
Why would I do that if I’m able to do it myself?I’m very impressed with your determination and ability to unistall/reinstall on jackstands.
Seriously, well done.Hindsight 20/20, would you have just paid a shop $150-$200 USD to do the work?
Seriously though, it would cost a lot more than that around here.
Last edited:
Whole bumper. Fixings for lower section not accessible.Whoa! Did you really need to take the whole bumper off? Or is the lower section not removable on its own?
Not actually too difficult.
Undertray off, wheelarches out, centre brake light off, fold back boot carpet to access 4 blots, disconnect 2 connectors, unclip from fenders, lift off.
I’m with you in that thought. My question was for others that are faced with the same choice. I paid $50 to have access to the lift for an hour. I would have paid someone I could trust to do the job right $200. Much more than that and I’d just do it myself.Why would I do that if I’m able to do it myself?
Seriously though, it would cost a lot more than that around here.
With my slow pace of automotive work, I don't think an hour would be enough. LOL.I’m with you in that thought. My question was for others that are faced with the same choice. I paid $50 to have access to the lift for an hour. I would have paid someone I could trust to do the job right $200. Much more than that and I’d just do it myself.
I plan on backing up the car onto ramps, dropping the bumper and under tray panels, and then just take my sweet ass time with it.
I love working on my cars while listening to podcasts and audiobooks. It's therapeutic.
I've always been curious about this: How did you get the car onto jack stands?Exactly my experience trying to do it on my patio by myself.
The silencer is prevented from going backwards or downwards by the exhaust finishers and the cat can’t go forward without hitting the subframe.
If you have access to a car lift and two burly blokes to wriggle apart the silencer and cat then it’s possible but it’s a PITA and the heatshield will take a battering.
I ended up biting the bullet that you described, definitely easier in the long run.
View attachment 38886
Coreyalert3
Well-known member
My buddy and I did it ourselves just jacking up the passenger side. Getting clearance was difficult but we managed to get it off without removing anything other than the black Diffuser piece and removing mid pipe bolts. The exhaust tips sit within fake exhaust garnishes and there's not enough clearance to remove the exhaust. We left the exhaust bolted in and finally were able to wiggle the 3rd Cat out of its home but it took some effort for sure. I'm sure something was slightly knicked or rubbed on that wouldn't be acceptable for a shop to do but as a car owner we can make those decisions in the moment if we so choose no real damage caused but not clean work technically lol.
Also, the OEM gasket was mangled upon separating from mid pipe. Not something you'd expect on a new car but I believe they are going to be included in the future. Ours doesn't seem to be leaking but I do plan on installing a new gasket soon.
Also, the OEM gasket was mangled upon separating from mid pipe. Not something you'd expect on a new car but I believe they are going to be included in the future. Ours doesn't seem to be leaking but I do plan on installing a new gasket soon.
I've always been curious about this: How did you get the car onto jack stands?
The chassis is stiff enough that you can jack up a side (like the front passenger) and then slide a jack stand under the rear lifting point on the same side (or the other way around).
- Thread starter
- #77
Not to worry, We will do as detailed of a write up as possible on install with our shop car next week.
If needed we will include some video clips for any tricky portions of the job.
If needed we will include some video clips for any tricky portions of the job.
Coreyalert3
Well-known member
Anything in the works for tuning options for the USA? Getting our 7200 RPM Redline back would be niceNot to worry, We will do as detailed of a write up as possible on install with our shop car next week.
If needed we will include some video clips for any tricky portions of the job.
- Thread starter
- #79
We will hopefully have some options in a few months.Anything in the works for tuning options for the USA? Getting our 7200 RPM Redline back would be niceI know there's JUBU but a stateside option is ideal.
Need to get a car to BOE so they can do some development.
Im sure Olympic will also have something available that will align with our exhausts and intakes as well as Eventuri intakes.
Installed the GRP decat and Milltek valve controller. It really brings the car alive. The sound difference is VERY noticeable in a positive way. Much more aggressive and deeper tone and louder in general.
It could be a mental thing, but the throttle response feels a bit sharper and the car definitely seems slightly quicker. I'm sure it's not a huge gain in power but the sound in and of itself is worth every penny.
Also, it takes 30 seconds to program/map the mirror Homelink buttons to the Milltek controller buttons so I just stowed the fobs away in my glovebox with the manuals after doing so. Now i just press the middle button for loud/fully open and the 3rd button for quiet (which is basically only for long highway hauls or entering neighborhoods at sensitive times).
What a fantastic pair of upgrades for relatively low cost. If you're not in a state that does CARB testing, I HIGHLY recommend you delete that third cat ASAP! Thanks @GRP. The pipe fit great. It was a bit snug and we had to use some channel locks to clamp it onto the midpipe but overall it was a smooth process (we were using a lift so that helped a ton!).
Similar threads
- Replies
- 67
- Views
- 12K


