
Hi folks. Just replaced my drivers seat with a Tillet B10 from Greg’s Race Parts and I love the lower seating position and better ergonomics of the Tillet.
Some have asked for details of the install so I thought I would share them here.
Factory seat removal:
Slide the seat back far enough to loosen/remove the bolts holding down the front of each rail. T45 torx
Slide the seat forward far enough to loosen/remove the rear bolts.
Angle the back of the seat all the way forward/upright. This should allow you enough space to tip the entire seat backwards so you can access the wiring harness connections.
At this point I disconnected the battery. You can probably do this with the battery connected, but I didn’t want to risk accidentally triggering an airbag fault (this can happen if you turn on the ignition and the airbag harness is disconnected).
The wiring harness is zip tied to the floor. Cut the zip tie to give yourself some leeway with the harness.
The two electrical connections are located under the carpet. There is a pre-cut rectangle of carpet that you can lift up to access the connections.
If you bought the GRP airbag/seatbelt delete set it will be easy to see how the connectors go together and come apart.

The yellow connector is held to the floor by a standard, press fit, plastic fitting. You can see it attached to the side of the connector in the photo above.
After disconnecting the two connectors, you need to unscrew the seatbelt anchored to the outside edge of the seat.
Remove the plastic cover on the side of the seat. There are three, press-fit tabs horizontally across the cover. After gently pulling these out (just gently rock the cover while pulling outwards along the bottom), the cover lifts up and over two tabs located on the top edge.
In the first photo, you can see two of the rectangular slots that the press fit tabs slide into and you can see one of the tabs on top (near the middle of the seat) that you have to lift the cover up and over. In the second photo, you can see two rectangular slots (the middle one is the same one seen in the first photo) and you can see the rearward tab on top (alongside the back of the seat)


Once you remove the cover you can unscrew the bolt holding the seatbelt to the seat.
Now your seat is completely free and you can remove it from your car. I draped a moving blanket over the door sill to protect my car from any scratches. Other than being heavy, the seat is pretty easy to wrangle out of the car. I did raise my steering column up and in as far as I could to create more space.
At this point, I plugged in the two connectors in the GRP airbag delete kit and reconnected my battery.
You also need to remove the seatbelt receiver from the inboard side of the seat. There is an electrical connection (it tells the car when there is a seatbelt plugged into the receptacle) that you need to remove. To access the connector, there is a long plastic “U” channel along the inside of the seat fabric that you can easily remove by pulling the upholstery down and away from the side of the seat


After disconnecting the green connector, unbolt the seatbelt receiver from the seat.
Installing the Tillet B10
Assembly of the Tillet seat rail kit is straightforward so I won’t cover it in detail. I will mention a few things that are helpful to know in retrospect.
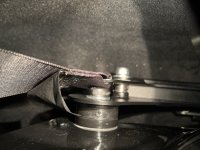
The Tillet seat uses different bolts to mount the seatbelt and seatbelt receptacle. The factory bolts are held in place with tight fitting washers that are designed to spin in place rather than screw off (see photo). I tried to gently pry them up while unscrewing the bolt but ultimately ended up pulling them off with pliers. If I ever decide to reinstall the factory seat, I likely will just have to buy new washers.

The Tillet seat rails require “extension arms” to reach the front mounting points in the car. Be sure to bolt them to the correct side of the seat rails (the flat side, not the side with a “u” shaped contour)
Attach the seat rail crossbar (the bar you pull up on to slide the seat), before installing the side plates (that the seat bolts to). If you don’t do it in this order, you won’t be able to attach it later as part of the side plates will interfere.
Attaching the side plates to the seat rails requires you to slide the rails back to access the front mounting holes and then forward to access the rear mounting holes.
The B10 seat comes with 30mm mounting bolts, but it really needs 50mm bolts because you will end up using all of the included spacers in the seat kit to fill the space between the side plates and the seat. A quick trip to the hardware store solved this issue. I messaged GRP and Greg is now aware of this issue. He even offered to ship me the bolts, but they were only $10 (for four) at my local hardware store (class 12.9)

Here is a photo of the spacers used between the mounting plate and the seat. Also note that although the seatbelt was originally mounted directly under the bolt that holds it in place, I mounted it more inboard between two parallel surfaces of the seat mounting plate. There is a spring supplied by Tillet that holds it in place and keeps it from rattling while still allowing it to rotate freely.
I’m 5’8 and set the seat in the rear second hole from the top and in the front 3rd hole from the top. So far, so good. Feel free to DM me with any questions
Here is a photo of the installed seat

waiting for the seat pads to be shipped from Tillet
Some have asked for details of the install so I thought I would share them here.
Factory seat removal:
Slide the seat back far enough to loosen/remove the bolts holding down the front of each rail. T45 torx
Slide the seat forward far enough to loosen/remove the rear bolts.
Angle the back of the seat all the way forward/upright. This should allow you enough space to tip the entire seat backwards so you can access the wiring harness connections.
At this point I disconnected the battery. You can probably do this with the battery connected, but I didn’t want to risk accidentally triggering an airbag fault (this can happen if you turn on the ignition and the airbag harness is disconnected).
The wiring harness is zip tied to the floor. Cut the zip tie to give yourself some leeway with the harness.
The two electrical connections are located under the carpet. There is a pre-cut rectangle of carpet that you can lift up to access the connections.
If you bought the GRP airbag/seatbelt delete set it will be easy to see how the connectors go together and come apart.
The yellow connector is held to the floor by a standard, press fit, plastic fitting. You can see it attached to the side of the connector in the photo above.
After disconnecting the two connectors, you need to unscrew the seatbelt anchored to the outside edge of the seat.
Remove the plastic cover on the side of the seat. There are three, press-fit tabs horizontally across the cover. After gently pulling these out (just gently rock the cover while pulling outwards along the bottom), the cover lifts up and over two tabs located on the top edge.
In the first photo, you can see two of the rectangular slots that the press fit tabs slide into and you can see one of the tabs on top (near the middle of the seat) that you have to lift the cover up and over. In the second photo, you can see two rectangular slots (the middle one is the same one seen in the first photo) and you can see the rearward tab on top (alongside the back of the seat)
Once you remove the cover you can unscrew the bolt holding the seatbelt to the seat.
Now your seat is completely free and you can remove it from your car. I draped a moving blanket over the door sill to protect my car from any scratches. Other than being heavy, the seat is pretty easy to wrangle out of the car. I did raise my steering column up and in as far as I could to create more space.
At this point, I plugged in the two connectors in the GRP airbag delete kit and reconnected my battery.
You also need to remove the seatbelt receiver from the inboard side of the seat. There is an electrical connection (it tells the car when there is a seatbelt plugged into the receptacle) that you need to remove. To access the connector, there is a long plastic “U” channel along the inside of the seat fabric that you can easily remove by pulling the upholstery down and away from the side of the seat
After disconnecting the green connector, unbolt the seatbelt receiver from the seat.
Installing the Tillet B10
Assembly of the Tillet seat rail kit is straightforward so I won’t cover it in detail. I will mention a few things that are helpful to know in retrospect.
The Tillet seat uses different bolts to mount the seatbelt and seatbelt receptacle. The factory bolts are held in place with tight fitting washers that are designed to spin in place rather than screw off (see photo). I tried to gently pry them up while unscrewing the bolt but ultimately ended up pulling them off with pliers. If I ever decide to reinstall the factory seat, I likely will just have to buy new washers.
The Tillet seat rails require “extension arms” to reach the front mounting points in the car. Be sure to bolt them to the correct side of the seat rails (the flat side, not the side with a “u” shaped contour)
Attach the seat rail crossbar (the bar you pull up on to slide the seat), before installing the side plates (that the seat bolts to). If you don’t do it in this order, you won’t be able to attach it later as part of the side plates will interfere.
Attaching the side plates to the seat rails requires you to slide the rails back to access the front mounting holes and then forward to access the rear mounting holes.
The B10 seat comes with 30mm mounting bolts, but it really needs 50mm bolts because you will end up using all of the included spacers in the seat kit to fill the space between the side plates and the seat. A quick trip to the hardware store solved this issue. I messaged GRP and Greg is now aware of this issue. He even offered to ship me the bolts, but they were only $10 (for four) at my local hardware store (class 12.9)
Here is a photo of the spacers used between the mounting plate and the seat. Also note that although the seatbelt was originally mounted directly under the bolt that holds it in place, I mounted it more inboard between two parallel surfaces of the seat mounting plate. There is a spring supplied by Tillet that holds it in place and keeps it from rattling while still allowing it to rotate freely.
I’m 5’8 and set the seat in the rear second hole from the top and in the front 3rd hole from the top. So far, so good. Feel free to DM me with any questions
Here is a photo of the installed seat
waiting for the seat pads to be shipped from Tillet
Attachments
Last edited:


