Navigation
Install the app
How to install the app on iOS
Follow along with the video below to see how to install our site as a web app on your home screen.
Note: This feature may not be available in some browsers.
More options
Style variation
-
📸 We've added a new feature to the site, the Showcase! You can check it out at this link: EmiraForum.com Showcase
🖼️ You can read a bit more at the announcement thread as well: Showcase -- an upgraded Journal
You are using an out of date browser. It may not display this or other websites correctly.
You should upgrade or use an alternative browser.
You should upgrade or use an alternative browser.
📓 Journals kitkat's Emira
- Thread starter kitkat
- Start date
This prefix is only usable in the Lotus Emira Journals forum.
- Thread starter
- #104
This could be achieved by prototyping a gated plate and then having cnc cut.And what about on top of gear install a Ferrari lever looks, made on metal
You’d then need to unbolt the adjustable lockout plate so that the shifter can freely shift into reverse without lifting the collar.
Now comes the tricky part, you would need to remove the lockout sleeve from the shifter and hope the remaining shaft is thin enough so that you can fabricate an actual H pattern plate without any overlap.
- Thread starter
- #105
You can see that you’d have to remove, 6, 12, 2, 23, 24, 31 and thread the knob directly to shaft 3. Then you pray that part 3 is thin enough at the plane where you plan to put the plate to be able to make a non overlapping 6 speed with reverse plate H pattern.
You may have missed the original design concept for the interior of the car? The only reason they put a cage around the linkage in the first place was for safety regulations.Not a fan. Completely at odds with the rest of the interior esthetics. Mad skills though
See:
Let's say it's not. For argument sake.View attachment 53951
You can see that you’d have to remove, 6, 12, 2, 23, 24, 31 and thread the knob directly to shaft 3. Then you pray that part 3 is thin enough at the plane where you plan to put the plate to be able to make a non overlapping 6 speed with reverse plate H pattern.
It does not look like a terrifically complicate "swap" to redesign a thinner shaft that would include a ball joint end such as part 3, that would fit in the base part (7).
The biggest challenge I see in that would be whether the upper shift linkage (mount part 5, cable end 46 etc). Would be able to be screwed onto a shaft thin enough to get the job done. A separate collar mechanism might be needed at that point. (Slides over the top with shift ball removed down to an indexed part of the shaft or similar
I also think the original design is well done, in that. Right now in the US I think there are 12 Cars you can buy new with a manualYou may have missed the original design concept for the interior of the car? The only reason they put a cage around the linkage in the first place was for safety regulations.
transmission. (Not counting base Kia, Versa, or Mazda3)
Ford Mustang
Honda Civic Type R / Acura Integra
Hyundai Elantra N
Lotus Emira
Mazda Miata
Nissan Z
Porsche 911 GT3 (non-RS) & S/T
Subaru WRX
BMW M2 (for limited time left)
Toyota GR 86 / Corolla / Supra
13 if you include the 2 Million dollar Aston Valour
There's a pretty big gap here in values.
The GR86 may easily lose it's manual as Toyota said next 86 car will be hybrid 3cly.
The Supra ends production next year
Nissan Z likely only to be offered another year to fill the Supra void
Miata is destined for a EV next car...this gen has been around a long time.
BMW already on its way out
That's it folks. By 2027 when the Emira exits production or however Lotus/Geely will pull it from the market, I suspect we will be down to just
Ford Mustang
Hyundai Elantra N
Honda CTR / Integra S
Subaru WRX
Maybe some expensive limited run Porsche 911s and whatever other billionaire toys from Aston or Ferrari or whoever else.
At this point as an auto manufacturer, if you aren't doing something special and celebrating the manual transmission you still offer. Whether with a fun shift knob, a cool attention grabbing red boot, a gated cover, polished linkage, whatever. In my mind, you are doing it wrong.
Leave no confusion. Create no doubt. "Yes it even comes in a manual option" should be in every marketing material and commercial tag line.
Shahaf2911
Emira Fan
I’m so tempted to do it both, looks saw raw I love the idea! One question tho, can anything fall in those gaps ? And if so where does it lead to ? Maybe that’s why there is a mesh haha.I promise y’all aren’t ready for this…
Amazing work btw!
Attachments
Interesting idea! Surprised no one else has asked this, but how did you cleanly remove the mesh surround? If that octopus shaped piece was anodized or painted to match it would look great, but currently it makes it look a bit unfinished to me.
- Thread starter
- #111
Let's say it's not. For argument sake.
It does not look like a terrifically complicate "swap" to redesign a thinner shaft that would include a ball joint end such as part 3, that would fit in the base part (7).
The biggest challenge I see in that would be whether the upper shift linkage (mount part 5, cable end 46 etc). Would be able to be screwed onto a shaft thin enough to get the job done. A separate collar mechanism might be needed at that point. (Slides over the top with shift ball removed down to an indexed part of the shaft or similar
Yeah you’re thinking of all the right limitations. i’m guessing however that it is, that diagram is from an exige and they look extremely similar to how the Emira shifter looks. I bet there’s some parts carry over — for example the fore/aft shifter cable linkage that bolts into the shaft looks exactly the same, as does the reverse lockout octopus plate.
- Thread starter
- #112
I’m so tempted to do it both, looks saw raw I love the idea! One question tho, can anything fall in those gaps ? And if so where does it lead to ? Maybe that’s why there is a mesh haha.
Amazing work btw!
You indeed could, I’ll be designing a cover piece for this soon to reduce that risk, but I think you could run it as is with minimal risk as is. I do plan on selling the two 3d printed pieces for cheap later — and I’ll have both models available to download for someone to print themselves of course. Right now shipping costs 4x more than the material and power cost to print these off.
- Thread starter
- #113
I’ll make a separate DIY thread later down the line on all the steps required to get the lower cages out, it took me roughly an hour to get everything out while not necessarily knowing where everything is. I could do it in 30 minutes now.Interesting idea! Surprised no one else has asked this, but how did you cleanly remove the mesh surround? If that octopus shaped piece was anodized or painted to match it would look great, but currently it makes it look a bit unfinished to me.
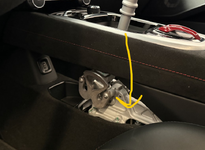
The nice part about the octopus plate after is you can easily access it and remove it temporarily (while not driving) to sand out the outside, polish it up, or even replace it completely with a piece of cnc aluminum if you’re capable of that.
It's the barrier plate for the rear lockout, and it creates the left "contact surface" of the 1-2 gate, so friction wear is a key consideration. Aluminum is far less durable than steel against friction in the 10 to 20+ year timeframe you'd assume for a car.There must be a reason they didn't use aluminum, right?
I will be polishing mine, I think. Should be a nice contrast against the cast aluminum main support.
Last edited:
- Thread starter
- #116
Agreed, but if also accessible and wears at a faster rate than the steel crossgate adjusting plate, you could just have a few made in from CNC machinist and have a lifetime supply.It's the barrier plate for the rear lockout, and it creates the left "contact surface" of the 1-2 gate, so friction wear is a key consideration. Aluminum is far less durable against friction in the 10 to 20+ year timeframe you'd assume for a car.
I will be polishing mine, I think.
- Thread starter
- #117
Also does anyone know why this plate is shaped this way? Maybe it has some Lotus significance, it’s an odd shape given the rest of the shifter assembly. I understand the round top but not the rest of it.
Six Speed Stephen
Emira Fiend
You may have missed the original design concept for the interior of the car? The only reason they put a cage around the linkage in the first place was for safety regulations.
See:
View attachment 53953
The original design has all of the metal pieces polished. I think doing that would complete the look and appear more sleek. Would it be possible to polish all of those components?
Last edited:
Shahaf2911
Emira Fan
Yeah I figured, waiting to see your progress! I’ll definitely do this project down the line when I find some time, thanks for the info and sharing all your hard workYou indeed could, I’ll be designing a cover piece for this soon to reduce that risk, but I think you could run it as is with minimal risk as is. I do plan on selling the two 3d printed pieces for cheap later — and I’ll have both models available to download for someone to print themselves of course. Right now shipping costs 4x more than the material and power cost to print these off.
A Dremel with a polishing ball is your friend.The original design has all of the metal pieces polished. I think doing that would complete the look and appear more sleek. Would it be possible to polish all of those components?
Similar threads
- Article
🏆 EPOTM Winner
kitkat - 🏆 December 2024 Emira of the Month Winner!
- Replies
- 14
- Views
- 2K
- Replies
- 15
- Views
- 2K


